Welcome to the OpenFunction documentation site!
This is the multi-page printable view of this section. Click here to print.
v1.2 (latest)
- 1: Introduction
- 2: Getting Started
- 2.1: Installation
- 2.2: Quickstarts
- 2.2.1: Prerequisites
- 2.2.2: Create Sync Functions
- 2.2.3: Create Async Functions
- 2.2.4: Create Serverless Applications
- 2.2.5: Create Wasm Functions
- 3: Concepts
- 3.1: Function Definition
- 3.2: Function Build
- 3.3: Build Strategy
- 3.4: Function Trigger
- 3.5: Function Outputs
- 3.6: Function Scaling
- 3.7: Function Signatures
- 3.8: Wasm Functions
- 3.9: Serverless Applications
- 3.10: BaaS Integration
- 3.11: Networking
- 3.11.1: Introduction
- 3.11.2: OpenFunction Gateway
- 3.11.3: Route
- 3.11.4: Function Entrypoints
- 3.12: CI/CD
- 3.13: OpenFunction Events
- 3.13.1: Introduction
- 3.13.2: Use EventSource
- 3.13.3: Use EventBus and Trigger
- 3.13.4: Use Multiple Sources in One EventSource
- 3.13.5: Use ClusterEventBus
- 3.13.6: Use Trigger Conditions
- 4: Operations
- 4.1: Networking
- 5: Best Practices
- 5.1: Create a Knative-based Function to Interact with Middleware
- 5.2: Use SkyWalking for OpenFunction as an Observability Solution
- 5.3: Elastic Log Alerting
- 6: Reference
- 6.1: Component Specifications
- 6.1.1: Function Specifications
- 6.1.2: EventSource Specifications
- 6.1.2.1: EventSource Specifications
- 6.1.2.2: Redis
- 6.1.2.3: Kafka
- 6.1.2.4: Cron
- 6.1.3: EventBus Specifications
- 6.1.3.1: EventBus Specifications
- 6.1.3.2: NATS Streaming
- 6.1.4: Trigger Specifications
- 6.2: FAQ
- 7: Contributing
1 - Introduction
Overview
OpenFunction is a cloud-native open source FaaS (Function as a Service) platform aiming to let you focus on your business logic without having to maintain the underlying runtime environment and infrastructure. You can generate event-driven and dynamically scaling Serverless workloads by simply submitting business-related source code in the form of functions.

Architecture and Design

Core Features
- Cloud agnostic and decoupled with cloud providers’ BaaS
- Pluggable architecture that allows multiple function runtimes
- Support both sync and async functions
- Unique async functions support that can consume events directly from event sources
- Support generating OCI-Compliant container images directly from function source code.
- Flexible autoscaling between 0 and N
- Advanced async function autoscaling based on event sources’ specific metrics
- Simplified BaaS integration for both sync and async functions by introducing Dapr
- Advanced function ingress & traffic management powered by K8s Gateway API (In Progress)
- Flexible and easy-to-use events management framework
License
OpenFunction is licensed under the Apache License, Version 2.0. For more information, see LICENSE.
2 - Getting Started
2.1 - Installation
This document describes how to install OpenFunction.
Prerequisites
You need to have a Kubernetes cluster.
You need to ensure your Kubernetes version meets the requirements described in the following compatibility matrix.
| OpenFunction Version | Kubernetes 1.21 | Kubernetes 1.22 | Kubernetes 1.23 | Kubernetes 1.24 | Kubernetes 1.25 | Kubernetes 1.26+ |
|---|---|---|---|---|---|---|
| HEAD | N/A | N/A | √ | √ | √ | √ |
| v1.2 | N/A | N/A | √ | √ | √ | √ |
| v1.1.x | √ | √ | √ | √ | √ | N/A |
| v1.0.x | √ | √ | √ | √ | √ | N/A |
Install OpenFunction
Now you can install OpenFunction and all its dependencies with helm charts.
The
ofnCLI install method is deprecated.
If you want to install OpenFunction in an offline environment, please refer to Install OpenFunction in an offline environment
Requirements
- Kubernetes version:
>=v1.21.0-0 - Helm version:
>=v3.6.3
Steps to install OpenFunction helm charts
Run the following command to add the OpenFunction chart repository first:
helm repo add openfunction https://openfunction.github.io/charts/
helm repo update
Then you have several options to setup OpenFunction, you can choose to:
Install all components:
kubectl create namespace openfunction
helm install openfunction openfunction/openfunction -n openfunction
Install all components and Revision Controller:
kubectl create namespace openfunction
helm install openfunction openfunction/openfunction -n openfunction --set revisionController.enable=true
Install Serving only (without build):
kubectl create namespace openfunction
helm install openfunction --set global.ShipwrightBuild.enabled=false --set global.TektonPipelines.enabled=false openfunction/openfunction -n openfunction
Install Knative sync runtime only:
kubectl create namespace openfunction
helm install openfunction --set global.Keda.enabled=false openfunction/openfunction -n openfunction
Install OpenFunction async runtime only:
kubectl create namespace openfunction
helm install openfunction --set global.Contour.enabled=false  --set global.KnativeServing.enabled=false openfunction/openfunction -n openfunction
Note
For more information about how to install OpenFunction with Helm, see Install OpenFunction with Helm.Run the following command to verify OpenFunction is up and running:
kubectl get po -n openfunction
Uninstall OpenFunction
Helm
If you installed OpenFunction with Helm, run the following command to uninstall OpenFunction and its dependencies.
helm uninstall openfunction -n openfunction
Note
For more information about how to uninstall OpenFunction with Helm, see Uninstall OpenFunction with Helm.Upgrade OpenFunction
helm upgrade [RELEASE_NAME] openfunction/openfunction -n openfunction
With Helm v3, CRDs created by this chart are not updated by default and should be manually updated. See also the Helm Documentation on CRDs.
Refer to helm upgrade for command documentation.
Upgrading an existing Release to a new version
From OpenFunction v0.6.0 to OpenFunction v0.7.x
There is a breaking change when upgrading from v0.6.0 to 0.7.x which requires additional manual operations.
Uninstall the Chart
First, you’ll need to uninstall the old openfunction release:
helm uninstall openfunction -n openfunction
Confirm that the component namespaces have been deleted, it will take a while:
kubectl get ns -o=jsonpath='{range .items[?(@.metadata.annotations.meta\.helm\.sh/release-name=="openfunction")]}{.metadata.name}: {.status.phase}{"\n"}{end}'
If the knative-serving namespace is in the terminating state for a long time, try running the following command and remove finalizers:
kubectl edit ingresses.networking.internal.knative.dev -n knative-serving
Upgrade OpenFunction CRDs
Then you’ll need to upgrade the new OpenFunction CRDs
kubectl apply -f https://openfunction.sh1a.qingstor.com/crds/v0.7.0/openfunction.yaml
Upgrade dependent components CRDs
You also need to upgrade the dependent components’ CRDs
You only need to deal with the components included in the existing Release.
- knative-serving CRDs
kubectl apply -f https://openfunction.sh1a.qingstor.com/crds/v0.7.0/knative-serving.yaml - shipwright-build CRDs
kubectl apply -f https://openfunction.sh1a.qingstor.com/crds/v0.7.0/shipwright-build.yaml - tekton-pipelines CRDs
kubectl apply -f https://openfunction.sh1a.qingstor.com/crds/v0.7.0/tekton-pipelines.yaml
Install new chart
helm repo update
helm install openfunction openfunction/openfunction -n openfunction
Note
For more information about how to upgrade OpenFunction with Helm, see Upgrade OpenFunction with Helm.2.2 - Quickstarts
2.2.1 - Prerequisites
Registry Credential
When building a function, you’ll need to push your function container image to a container registry like Docker Hub or Quay.io. To do that you’ll need to generate a secret for your container registry first.
You can create this secret by filling in the REGISTRY_SERVER, REGISTRY_USER and REGISTRY_PASSWORD fields, and then run the following command.
REGISTRY_SERVER=https://index.docker.io/v1/
REGISTRY_USER=<your_registry_user>
REGISTRY_PASSWORD=<your_registry_password>
kubectl create secret docker-registry push-secret \
 --docker-server=$REGISTRY_SERVER \
 --docker-username=$REGISTRY_USER \
 --docker-password=$REGISTRY_PASSWORD
Source repository Credential
If your source code is in a private git repository, you’ll need to create a secret containing the private git repo’s username and password:
cat <<EOF | kubectl apply -f -
apiVersion: v1
kind: Secret
metadata:
  name: git-repo-secret
  annotations:
    build.shipwright.io/referenced.secret: "true"
type: kubernetes.io/basic-auth
stringData:
  username: <cleartext username>
  password: <cleartext password>
EOF
You can then reference this secret in the Function CR’s spec.build.srcRepo.credentials
apiVersion: core.openfunction.io/v1beta1
kind: Function
metadata:
  name: function-sample
spec:
  version: "v2.0.0"
  image: "openfunctiondev/sample-go-func:v1"
  imageCredentials:
    name: push-secret
  build:
    builder: openfunction/builder-go:latest
    env:
      FUNC_NAME: "HelloWorld"
      FUNC_CLEAR_SOURCE: "true"
    srcRepo:
      url: "https://github.com/OpenFunction/samples.git"
      sourceSubPath: "functions/knative/hello-world-go"
      revision: "main"
      credentials:
         name: git-repo-secret
  serving:
    template:
      containers:
        - name: function # DO NOT change this
          imagePullPolicy: IfNotPresent
    runtime: "knative"
Kafka
Async functions can be triggered by events in message queues like Kafka, here you can find steps to setup a Kafka cluster for demo purpose.
Install strimzi-kafka-operator in the default namespace.
helm repo add strimzi https://strimzi.io/charts/
helm install kafka-operator -n default strimzi/strimzi-kafka-operator
Run the following command to create a Kafka cluster and Kafka Topic in the default namespace. The Kafka and Zookeeper clusters created by this command have a storage type of ephemeral and are demonstrated using emptyDir.
Here we create a 1-replica Kafka server named
<kafka-server>and a 1-replica topic named<kafka-topic>with 10 partitionscat <<EOF | kubectl apply -f - apiVersion: kafka.strimzi.io/v1beta2 kind: Kafka metadata: name: <kafka-server> namespace: default spec: kafka: version: 3.3.1 replicas: 1 listeners: - name: plain port: 9092 type: internal tls: false - name: tls port: 9093 type: internal tls: true config: offsets.topic.replication.factor: 1 transaction.state.log.replication.factor: 1 transaction.state.log.min.isr: 1 default.replication.factor: 1 min.insync.replicas: 1 inter.broker.protocol.version: "3.1" storage: type: ephemeral zookeeper: replicas: 1 storage: type: ephemeral entityOperator: topicOperator: {} userOperator: {} --- apiVersion: kafka.strimzi.io/v1beta2 kind: KafkaTopic metadata: name: <kafka-topic> namespace: default labels: strimzi.io/cluster: <kafka-server> spec: partitions: 10 replicas: 1 config: cleanup.policy: delete retention.ms: 7200000 segment.bytes: 1073741824 EOFRun the following command to check Pod status and wait for Kafka and Zookeeper to run and start.
$ kubectl get po
NAME                                              READY   STATUS        RESTARTS   AGE
<kafka-server>-entity-operator-568957ff84-nmtlw   3/3     Running       0          8m42s
<kafka-server>-kafka-0                            1/1     Running       0          9m13s
<kafka-server>-zookeeper-0                        1/1     Running       0          9m46s
strimzi-cluster-operator-687fdd6f77-cwmgm         1/1     Running       0          11m
Run the following command to view the metadata for the Kafka cluster.
$ kafkacat -L -b <kafka-server>-kafka-brokers:9092
WasmEdge
Function now supports using WasmEdge as workload runtime, here you can find steps to setup the WasmEdge workload runtime in a Kubernetes cluster (with containerd as the container runtime).
You should run the following steps on all the nodes (or a subset of the nodes that will host the wasm workload) of your cluster.
Step 1 : Installing WasmEdge
The easiest way to install WasmEdge is to run the following command. Your system should have git and curl installed.
wget -qO- https://raw.githubusercontent.com/WasmEdge/WasmEdge/master/utils/install.sh | bash -s -- -p /usr/local
Step 2 : Installing Container runtimes
crun
The crun project has WasmEdge support baked in. For now, the easiest approach is just download the binary and move it to /usr/local/bin/
wget https://github.com/OpenFunction/OpenFunction/releases/latest/download/crun-linux-amd64
mv crun-linux-amd64 /usr/local/bin/crun
If the above approach does not work for you, please refer to build and install a crun binary with WasmEdge support.
Step 3 : Setup CRI runtimes
Option 1: containerd
You can follow this installation guide to install containerd and this setup guide to setup containerd for Kubernetes.
First, edit the configuration /etc/containerd/config.toml, add the following section to setup crun runtime, make sure the BinaryName equal to your crun binary path
# Add crun runtime here
[plugins."io.containerd.grpc.v1.cri".containerd.runtimes.crun]
  runtime_type = "io.containerd.runc.v2"
  pod_annotations = ["*.wasm.*", "wasm.*", "module.wasm.image/*", "*.module.wasm.image", "module.wasm.image/variant.*"]
  privileged_without_host_devices = false
  [plugins."io.containerd.grpc.v1.cri".containerd.runtimes.crun.options]
    BinaryName = "/usr/local/bin/crun"
Next, restart containerd service:
sudo systemctl restart containerd
Option 2: CRI-O
You can follow this installation guide to install CRI-O and this setup guide to setup CRI-O for Kubernetes.
CRI-O uses the runc runtime by default and we need to configure it to use crun instead. That is done by adding to two configuration files.
First, create a /etc/crio/crio.conf file and add the following lines as its content. It tells CRI-O to use crun by default.
[crio.runtime]
default_runtime = "crun"
The crun runtime is in turn defined in the /etc/crio/crio.conf.d/01-crio-runc.conf file.
[crio.runtime.runtimes.runc]
runtime_path = "/usr/lib/cri-o-runc/sbin/runc"
runtime_type = "oci"
runtime_root = "/run/runc"
# The above is the original content

# Add crun runtime here
[crio.runtime.runtimes.crun]
runtime_path = "/usr/local/bin/crun"
runtime_type = "oci"
runtime_root = "/run/crun"
Next, restart CRI-O to apply the configuration changes.
systemctl restart crio
2.2.2 - Create Sync Functions
Before you creating any functions, make sure you’ve installed all the prerequisites
Sync functions are functions whose inputs are payloads of HTTP requests, and the output or response are sent to the waiting client immediately after the function logic finishes processing the inputs payload. Below you can find some sync function examples in different languages:
You can find more function samples here
2.2.3 - Create Async Functions
Before you creating any functions, make sure you’ve installed all the prerequisites
Async functions are event-driven and their inputs are usually events from Non-HTTP event sources like message queues, cron triggers, MQTT brokers etc. and usually the client will not wait for an immediate response after triggering an async function by delivering an event. Below you can find some async function examples in different languages:
| Async Functions | |
|---|---|
| Go | Kafka input & HTTP output binding, Cron input & Kafka output binding, Cron input binding, Kafka input binding, Kafka pubsub |
| Nodejs | MQTT binding & pubsub |
| Python | |
| Java | Cron input & Kafka output binding, Kafka pubsub |
| DotNet |
You can find more function samples here
2.2.4 - Create Serverless Applications
Before you creating any functions, make sure you’ve installed all the prerequisites
In addition to building and running Serverless Functions, you can also build and run Serverless Applications with OpenFuntion.
Here you can find several Serverless Application examples:
| Serverless Applications | |
|---|---|
| Go | Go App with a Dockerfile |
| Java | Java App with a Dockerfile, Java App without a Dockerfile & Source Code |
You can find more info about these Serverless Applications here
2.2.5 - Create Wasm Functions
Before you creating any functions, make sure you’ve installed all the prerequisites
Here you can find wasm function examples:
| Language | Wasm Functions | Runtime |
|---|---|---|
| Rust | wasmedge-http-server | wasmedge |
You can find more info about these Function here
3 - Concepts
3.1 - Function Definition
Function
Function is the control plane of Build and Serving and it’s also the interface for users to use OpenFunction. Users needn’t to create the Build or Serving separately because Function is the only place to define a function’s Build and Serving.
Once a function is created, it will controll the lifecycle of Build and Serving without user intervention:
If
Buildis defined in a function, a builder custom resource will be created to build function’s container image once a function is deployed.If
Servingis defined in a function, a serving custom resource will be created to control a function’s serving and autoscalling.BuildandServingcan be defined together which means the function image will be built first and then it will be used in serving.Buildcan be defined withoutServing, the function is used to build image only in this case.Servingcan be defined withoutBuild, the function will use a previously built function image for serving.
Build
OpenFunction uses Shipwright and Cloud Native Buildpacks to build the function source code into container images.
Once a function is created with Build spec in it, a builder custom resource will be created which will use Shipwright to manage the build tools and strategy. The Shipwright will then use Tekton to control the process of building container images including fetching source code, generating image artifacts, and publishing images.

Serving
Once a function is created with Serving spec, a Serving custom resource will be created to control a function’s serving phase. Currently OpenFunction Serving supports two runtimes: the Knative sync runtime and the OpenFunction async runtime.
The sync runtime
For sync functions, OpenFunction currently supports using Knative Serving as runtime. And we’re planning to add another sync function runtime powered by the KEDA http-addon.
The async runtime
OpenFunction’s async runtime is an event-driven runtime which is implemented based on KEDA and Dapr. Async functions can be triggered by various event types like message queue, cronjob, and MQTT etc.

Reference
For more information, see Function Specifications.
3.2 - Function Build
Currently, OpenFunction supports building function images using Cloud Native Buildpacks without the need to create a Dockerfile.
In the meantime, you can also use OpenFunction to build Serverless Applications with Dockerfile.
Build functions by defining a build section
You can build your functions or applications from the source code in a git repo or from the source code stored locally.
Build functions from source code in a git repo
You can build a function image by simply adding a build section in the Function definition like below.
If there is a serving section defined as well, the function will be launched as soon as the build completes.
apiVersion: core.openfunction.io/v1beta2
kind: Function
metadata:
  name: logs-async-handler
spec:
  version: "v2.0.0"
  image: openfunctiondev/logs-async-handler:v1
  imageCredentials:
    name: push-secret
  build:
    builder: openfunction/builder-go:latest
    env:
      FUNC_NAME: "LogsHandler"
      FUNC_CLEAR_SOURCE: "true"
      ## Customize functions framework version, valid for functions-framework-go for now
      ## Usually you needn't to do so because the builder will ship with the latest functions-framework
      # FUNC_FRAMEWORK_VERSION: "v0.4.0"
      ## Use FUNC_GOPROXY to set the goproxy
      # FUNC_GOPROXY: "https://goproxy.cn"
    srcRepo:
      url: "https://github.com/OpenFunction/samples.git"
      sourceSubPath: "functions/async/logs-handler-function/"
      revision: "main"
To push the function image to a container registry, you have to create a secret containing the registry’s credential and add the secret to
imageCredentials. You can refer to the prerequisites for more info.
Build functions from local source code
To build functions or applications from local source code, you’ll need to package your local source code into a container image and push this image to a container registry.
Suppose your source code is in the samples directory, you can use the following Dockerfile to build a source code bundle image.
FROM scratch
WORKDIR /
COPY samples samples/
Then you can build the source code bundle image like this:
docker build -t <your registry name>/sample-source-code:latest -f </path/to/the/dockerfile> .
docker push <your registry name>/sample-source-code:latest
It’s recommended to use the empty image
scratchas the base image to build the source code bundle image, a non-empty base image may cause the source code copy to fail.
Unlike defining the spec.build.srcRepo.url field for the git repo method, you’ll need to define the spec.build.srcRepo.bundleContainer.image field instead.
apiVersion: core.openfunction.io/v1beta2
kind: Function
metadata:
  name: logs-async-handler
spec:
  build:
    srcRepo:
      bundleContainer:
        image: openfunctiondev/sample-source-code:latest
      sourceSubPath: "/samples/functions/async/logs-handler-function/"
The
sourceSubPathis the absolute path of the source code in the source code bundle image.
Build functions with the pack CLI
Usually it’s necessary to build function images directly from local source code especially for debug purpose or for offline environment. You can use the pack CLI for this.
Pack is a tool maintained by the Cloud Native Buildpacks project to support the use of buildpacks. It enables the following functionality:
- Build an application using buildpacks.
- Rebase application images created using buildpacks.
- Creation of various components used within the ecosystem.
Follow the instructions here to install the pack CLI tool.
You can find more details on how to use the pack CLI here.
To build OpenFunction function images from source code locally, you can follow the steps below:
Download function samples
git clone https://github.com/OpenFunction/samples.git
cd samples/functions/knative/hello-world-go
Build the function image with the pack CLI
pack build func-helloworld-go --builder openfunction/builder-go:v2.4.0-1.17 --env FUNC_NAME="HelloWorld" --env FUNC_CLEAR_SOURCE=true
Launch the function image locally
docker run --rm --env="FUNC_CONTEXT={\"name\":\"HelloWorld\",\"version\":\"v1.0.0\",\"port\":\"8080\",\"runtime\":\"Knative\"}" --env="CONTEXT_MODE=self-host" --name func-helloworld-go -p 8080:8080 func-helloworld-go
Visit the function
curl http://localhost:8080
Output example:
hello, world!
OpenFunction Builders
To build a function image with Cloud Native Buildpacks, a builder image is needed.
Here you can find builders for popular languages maintained by the OpenFunction community:
| Builders | |
|---|---|
| Go | openfunction/builder-go:v2.4.0 (openfunction/builder-go:latest) |
| Nodejs | openfunction/builder-node:v2-16.15 (openfunction/builder-node:latest) |
| Java | openfunction/builder-java:v2-11, openfunction/builder-java:v2-16, openfunction/builder-java:v2-17, openfunction/builder-java:v2-18 |
| Python | openfunction/gcp-builder:v1 |
| DotNet | openfunction/gcp-builder:v1 |
3.3 - Build Strategy
Build Strategy is used to control the build process. There are two types of strategies, ClusterBuildStrategy and BuildStrategy.
Both strategies define a group of steps necessary to control the application build process.
ClusterBuildStrategy is cluster-wide, while BuildStrategy is namespaced.
There are 4 built-in ClusterBuildStrategy in OpenFunction, you can find more details in the following sections.
openfunction
The openfunction ClusterBuildStrategy uses Buildpacks to build function images which is the default build strategy.
The following are the parameters of the openfunction ClusterBuildStrategy:
| Name | Type | Describe |
|---|---|---|
| RUN_IMAGE | string | Reference to a run image to use |
| CACHE_IMAGE | string | Cache Image is a way to preserve cache layers across different builds, which can improve build performance when building functions or applications with lots of dependencies like Java functions. |
| BASH_IMAGE | string | The bash image that the strategy used. |
| ENV_VARS | string | Environment variables to set during build-time. The formate is key1=value1,key2=value2. |
Users can set these parameters like this:
apiVersion: core.openfunction.io/v1beta2
kind: Function
metadata:
  name: logs-async-handler
spec:
  build:
    shipwright:
      params:
        RUN_IMAGE: ""
        ENV_VARS: ""
buildah
The buildah ClusterBuildStrategy uses buildah to build application images.
To use buildah ClusterBuildStrategy, you can define a Function like this:
apiVersion: core.openfunction.io/v1beta2
kind: Function
metadata:
  name: sample-go-app
  namespace: default
spec:
  build:
    builder: openfunction/buildah:v1.23.1
    dockerfile: Dockerfile
    shipwright:
      strategy:
        kind: ClusterBuildStrategy
        name: buildah
The following are the parameters of the buildah ClusterBuildStrategy:
| Name | Type | Describe | Default |
|---|---|---|---|
| registry-search | string | The registries for searching short name images such as golang:latest, separated by commas. | docker.io,quay.io |
| registry-insecure | string | The fully-qualified name of insecure registries. An insecure registry is a registry that does not have a valid SSL certificate or only supports HTTP. | |
| registry-block | string | The registries that need to block pull access. | "" |
kaniko
The kaniko ClusterBuildStrategy uses kaniko to build application images.
To use kaniko ClusterBuildStrategy, you can define a Function like this:
apiVersion: core.openfunction.io/v1beta2
kind: Function
metadata:
  name: function-kaniko
  namespace: default
spec:
  build:
    builder: openfunction/kaniko-executor:v1.7.0
    dockerfile: Dockerfile
    shipwright:
      strategy:
        kind: ClusterBuildStrategy
        name: kaniko
ko
The ko ClusterBuildStrategy uses ko to build Go application images.
To use ko ClusterBuildStrategy, you can define a Function like this:
apiVersion: core.openfunction.io/v1beta2
kind: Function
metadata:
  name: function-ko
  namespace: default
spec:
  build:
    builder: golang:1.17
    dockerfile: Dockerfile
    shipwright:
      strategy:
        kind: ClusterBuildStrategy
        name: ko
The following are the parameters of ko ClusterBuildStrategy:
| Name | Type | Describe | Default |
|---|---|---|---|
| go-flags | string | Value for the GOFLAGS environment variable. | "" |
| ko-version | string | Version of ko, must be either ’latest’, or a release name from https://github.com/google/ko/releases. | "" |
| package-directory | string | The directory inside the context directory containing the main package. | “.” |
Custom Strategy
Users can customize their own strategy. To customize strategy, you can refer to this.
3.4 - Function Trigger
Function Triggers are used to define how to trigger a function. Currently, there are two kinds of triggers: HTTP Trigger, and Dapr Trigger. The default trigger is HTTP trigger.
HTTP Trigger
HTTP Trigger triggers a function with an HTTP request. You can define an HTTP Trigger for a function like this:
apiVersion: core.openfunction.io/v1beta2
kind: Function
metadata:
  name: function-sample
spec:
  serving:
    triggers:
      http:
        port: 8080
        route:
          rules:
            - matches:
                - path:
                    type: PathPrefix
                    value: /echo
Dapr Trigger
Dapr Trigger triggers a function with events from Dapr bindings or Dapr pubsub. You can define a function with Dapr Trigger like this:
apiVersion: core.openfunction.io/v1beta2
kind: Function
metadata:
  name: logs-async-handler
  namespace: default
spec:
  serving:
    bindings:
      kafka-receiver:
        metadata:
          - name: brokers
            value: kafka-server-kafka-brokers:9092
          - name: authRequired
            value: "false"
          - name: publishTopic
            value: logs
          - name: topics
            value: logs
          - name: consumerGroup
            value: logs-handler
        type: bindings.kafka
        version: v1
    triggers:
      dapr:
        - name: kafka-receiver
          type: bindings.kafka
Function Inputs
Input is where a function can get extra input data from, Dapr State Stores is supported as Input currently.
You can define function input like this:
apiVersion: core.openfunction.io/v1beta2
kind: Function
metadata:
  name: logs-async-handler
  namespace: default
spec:
  serving:
    triggers:
      inputs:
        - dapr:
            name: mysql
            type: state.mysql
3.5 - Function Outputs
Function Outputs
Output is a component that the function can send data to, include:
- Any Dapr Output Binding components of the Dapr Bindings Building Block
- Any Dapr Pub/sub brokers components of the Dapr Pub/sub Building Block
For example, here you can find an async function with a cron input binding and a Kafka output binding:
apiVersion: core.openfunction.io/v1beta2
kind: Function
metadata:
  name: cron-input-kafka-output
spec:
  ...
  serving:
    ...
    outputs:
      - dapr:
          name: kafka-server
          type: bindings.kafka
          operation: "create"
    bindings:
      kafka-server:
        type: bindings.kafka
        version: v1
        metadata:
        - name: brokers
          value: "kafka-server-kafka-brokers:9092"
        - name: topics
          value: "sample-topic"
        - name: consumerGroup
          value: "bindings-with-output"
        - name: publishTopic
          value: "sample-topic"
        - name: authRequired
          value: "false"
Here is another async function example that use a Kafka Pub/sub component as input.
apiVersion: core.openfunction.io/v1beta2
kind: Function
metadata:
  name: autoscaling-subscriber
spec:
  ...
  serving:
    ...
    runtime: "async"
    outputs:
      - dapr:
          name: kafka-server
          type: pubsub.kafka
          topic: "sample-topic"
    pubsub:
      kafka-server:
        type: pubsub.kafka
        version: v1
        metadata:
          - name: brokers
            value: "kafka-server-kafka-brokers:9092"
          - name: authRequired
            value: "false"
          - name: allowedTopics
            value: "sample-topic"
          - name: consumerID
            value: "autoscaling-subscriber"
3.6 - Function Scaling
Scaling is one of the core features of a FaaS or Serverless platform.
OpenFunction defines function scaling in ScaleOptions and defines triggers to activate function scaling in Triggers
ScaleOptions
You can define unified function scale options for sync and async functions like below which will be valid for both sync and async functions:
apiVersion: core.openfunction.io/v1beta2
kind: Function
metadata:
  name: function-sample
spec:
  serving:
    scaleOptions:
      minReplicas: 0
      maxReplicas: 10
Usually simply defining minReplicas and maxReplicas is not enough for async functions. You can define seperate scale options for async functions like below which will override the minReplicas and maxReplicas.
You can find more details of async function scale options in KEDA ScaleObject Spec and KEDA ScaledJob Spec.
apiVersion: core.openfunction.io/v1beta2
kind: Function
metadata:
  name: function-sample
spec:
  serving:
    scaleOptions:
      minReplicas: 0
      maxReplicas: 10
      keda:
        scaledObject:
          pollingInterval: 15
          cooldownPeriod: 60
          advanced:
            horizontalPodAutoscalerConfig:
              behavior:
                scaleDown:
                  stabilizationWindowSeconds: 45
                  policies:
                  - type: Percent
                    value: 50
                    periodSeconds: 15
                scaleUp:
                  stabilizationWindowSeconds: 0
You can also set advanced scale options for Knative sync functions too which will override the minReplicas and maxReplicas.
You can find more details of the Knative sync function scale options here
apiVersion: core.openfunction.io/v1beta2
kind: Function
metadata:
  name: function-sample
spec:
  serving:
    scaleOptions:
      knative:
        autoscaling.knative.dev/initial-scale: "1"
        autoscaling.knative.dev/scale-down-delay: "0"
        autoscaling.knative.dev/window: "60s"
        autoscaling.knative.dev/panic-window-percentage: "10.0"
        autoscaling.knative.dev/metric: "concurrency"
        autoscaling.knative.dev/target: "100"
Triggers
Triggers define how to activate function scaling for async functions. You can use triggers defined in all KEDA scalers as OpenFunction’s trigger spec.
Sync functions’ scaling is activated by various options of HTTP requests which are already defined in the previous ScaleOption section.
apiVersion: core.openfunction.io/v1beta2
kind: Function
metadata:
  name: function-sample
spec:
  serving:
    scaleOptions:
      keda:
        triggers:
          - type: kafka
            metadata:
              topic: logs
              bootstrapServers: kafka-server-kafka-brokers.default.svc.cluster.local:9092
              consumerGroup: logs-handler
              lagThreshold: "20"
3.7 - Function Signatures
Comparison of different function signatures
There’re three function signatures in OpenFunction: HTTP, CloudEvent, and OpenFunction. Let’s explain this in more detail using Go function as an example.
HTTP and CloudEvent signatures can be used to create sync functions while OpenFunction signature can be used to create both sync and async functions.
Further more OpenFunction signature can utilize various Dapr building blocks including Bindings, Pub/sub etc to access various BaaS services that helps to create more powerful functions. (Dapr State management, Configuration will be supported soon)
| HTTP | CloudEvent | OpenFunction | |
|---|---|---|---|
| Signature | func(http.ResponseWriter, *http.Request) error | func(context.Context, cloudevents.Event) error | func(ofctx.Context, []byte) (ofctx.Out, error) |
| Sync Functions | Supported | Supported | Supported |
| Async Functions | Not supported | Not supported | Supported |
| Dapr Binding | Not supported | Not supported | Supported |
| Dapr Pub/sub | Not supported | Not supported | Supported |
Samples
As you can see, OpenFunction signature is the recommended function signature, and we’re working on supporting this function signature in more language runtimes.
3.8 - Wasm Functions
WasmEdge is a lightweight, high-performance, and extensible WebAssembly runtime for cloud native, edge, and decentralized applications. It powers serverless apps, embedded functions, microservices, smart contracts, and IoT devices.
OpenFunction now supports building and running wasm functions with WasmEdge as the workload runtime.
You can find the WasmEdge Integration proposal here
Wasm container images
The wasm image containing the wasm binary is a special container image without the OS layer. An special annotation module.wasm.image/variant: compat-smart should be added to this wasm container image for a wasm runtime like WasmEdge to recognize it. This is handled automatically in OpenFunction and users only need to specify the workloadRuntime as wasmedge.
The build phase of the wasm container images
If function.spec.workloadRuntime is set to wasmedge or the function’s annotation contains module.wasm.image/variant: compat-smart,
function.spec.build.shipwright.strategy will be automatically generated based on the ClusterBuildStrategy named wasmedge in order to build a wasm container image with the module.wasm.image/variant: compat-smart annotation.
The serving phase of the wasm container images
When function.spec.workloadRuntime is set to wasmedge or the function’s annotation contains module.wasm.image/variant: compat-smart:
- If
function.spec.serving.annotationsdoes not containmodule.wasm.image/variant,module.wasm.image/variant: compat-smartwill be automatically added tofunction.spec.serving.annotations. - If
function.spec.serving.template.runtimeClassNameis not set, thisruntimeClassNamewill be automatically set to the defaultopenfunction-crun
If your kubernetes cluster is in a public cloud like
Azure, you can setspec.serving.template.runtimeClassNamemanually to override the defaultruntimeClassName.
Build and run wasm functions
To setup
WasmEdgeworkload runtime in kubernetes cluster and push images to a container registry, please refer to the prerequisites section for more info.
You can find more info about this sample Function here.
- Create a wasm function
cat <<EOF | kubectl apply -f -
apiVersion: core.openfunction.io/v1beta2
kind: Function
metadata:
  name: wasmedge-http-server
spec:
  workloadRuntime: wasmedge
  image: openfunctiondev/wasmedge_http_server:0.1.0
  imageCredentials:
    name: push-secret
  build:
    dockerfile: Dockerfile
    srcRepo:
      revision: main
      sourceSubPath: functions/knative/wasmedge/http-server
      url: https://github.com/OpenFunction/samples
  serving:
    scaleOptions:
      minReplicas: 0
    template:
      containers:
        - command:
            - /wasmedge_hyper_server.wasm
          imagePullPolicy: IfNotPresent
          livenessProbe:
            initialDelaySeconds: 3
            periodSeconds: 30
            tcpSocket:
              port: 8080
          name: function
    triggers:
      http:
        port: 8080
        route:
          rules:
            - matches:
                - path:
                    type: PathPrefix
                    value: /echo
EOF
- Check the wasm function status
kubectl get functions.core.openfunction.io -w
NAME                   BUILDSTATE   SERVINGSTATE   BUILDER         SERVING         ADDRESS                                                      AGE
wasmedge-http-server   Succeeded    Running        builder-4p2qq   serving-lrd8c   http://wasmedge-http-server.default.svc.cluster.local/echo   12m
- Access the wasm function
Once the BUILDSTATE becomes Succeeded and the SERVINGSTATE becomes Running, you can access this function through the address in the ADDRESS field:
kubectl run curl --image=radial/busyboxplus:curl -i --tty
curl http://wasmedge-http-server.default.svc.cluster.local/echo  -X POST -d "WasmEdge"
WasmEdge
3.9 - Serverless Applications
In addition to building and running Serverless Functions, you can also build and run Serverless Applications with OpenFuntion.
OpenFunction support building source code into container images in two different ways:
- Using Cloud Native Buildpacks to build source code without a
Dockerfile - Using Buildah or BuildKit to build source code with a
Dockerfile
To push images to a container registry, you’ll need to create a secret containing the registry’s credential and add the secret to
imageCredentials. Please refer to the prerequisites section for more info.
Build and run a Serverless Application with a Dockerfile
If you already created a Dockerfile for your application like this Go Application, you can build and run this application in the serverless way like this:
- Create the sample go serverless application
cat <<EOF | kubectl apply -f -
apiVersion: core.openfunction.io/v1beta2
kind: Function
metadata:
  name: sample-go-app
  namespace: default
spec:
  build:
    builder: openfunction/buildah:v1.23.1
    shipwright:
      strategy:
        kind: ClusterBuildStrategy
        name: buildah
    srcRepo:
      revision: main
      sourceSubPath: apps/buildah/go
      url: https://github.com/OpenFunction/samples.git
  image: openfunctiondev/sample-go-app:v1
  imageCredentials:
    name: push-secret
  serving:
    template:
      containers:
        - imagePullPolicy: IfNotPresent
          name: function
    triggers:
      http:
        port: 8080
  version: v1.0.0
  workloadRuntime: OCIContainer
EOF
- Check the application status
You can then check the serverless app’s status by kubectl get functions.core.openfunction.io -w:
kubectl get functions.core.openfunction.io -w
NAME                    BUILDSTATE   SERVINGSTATE   BUILDER         SERVING         ADDRESS                                                   AGE
sample-go-app           Succeeded    Running        builder-jgnzp   serving-q6wdp   http://sample-go-app.default.svc.cluster.local/           22m
- Access this application
Once the BUILDSTATE becomes Succeeded and the SERVINGSTATE becomes Running, you can access this Go serverless app through the address in the ADDRESS field:
kubectl run curl --image=radial/busyboxplus:curl -i --tty
curl http://sample-go-app.default.svc.cluster.local
Here you can find a Java Serverless Applications (with a Dockerfile) example.
Build and run a Serverless Application without a Dockerfile
If you hava an application without a Dockerfile like this Java Application, you can also build and run your application in the serverless way like this Java application:
- Create the sample Java serverless application
cat <<EOF | kubectl apply -f -
apiVersion: core.openfunction.io/v1beta2
kind: Function
metadata:
  name: sample-java-app-buildpacks
  namespace: default
spec:
  build:
    builder: cnbs/sample-builder:alpine
    srcRepo:
      revision: main
      sourceSubPath: apps/java-maven
      url: https://github.com/buildpacks/samples.git
  image: openfunction/sample-java-app-buildpacks:v1
  imageCredentials:
    name: push-secret
  serving:
    template:
      containers:
        - imagePullPolicy: IfNotPresent
          name: function
          resources: {}
    triggers:
      http:
        port: 8080
  version: v1.0.0
  workloadRuntime: OCIContainer

EOF
- Check the application status
You can then check the serverless app’s status by kubectl get functions.core.openfunction.io -w:
kubectl get functions.core.openfunction.io -w
NAME                                 BUILDSTATE   SERVINGSTATE   BUILDER         SERVING         ADDRESS                                                                AGE
sample-java-app-buildpacks           Succeeded    Running        builder-jgnzp   serving-q6wdp   http://sample-java-app-buildpacks.default.svc.cluster.local/           22m
- Access this application
Once the BUILDSTATE becomes Succeeded and the SERVINGSTATE becomes Running, you can access this Java serverless app through the address in the ADDRESS field:
kubectl run curl --image=radial/busyboxplus:curl -i --tty
curl http://sample-java-app-buildpacks.default.svc.cluster.local
3.10 - BaaS Integration
One of the unique features of OpenFunction is its simple integration with various backend services (BaaS) through Dapr. Currently, OpenFunction supports Dapr pub/sub and bindings building blocks, and more will be added in the future.
In OpenFunction v0.7.0 and versions prior to v0.7.0, OpenFunction integrates with BaaS by injecting a dapr sidecar container into each function instance’s pod, which leads to the following problems:
- The entire function instance’s launch time is slowed down by the launching of the dapr sidecar container.
- The dapr sidecar container may consume more resources than the function container itself.
To address the problems above, OpenFunction introduces the Dapr Standalone Mode in v0.8.0.
Dapr Standalone Mode
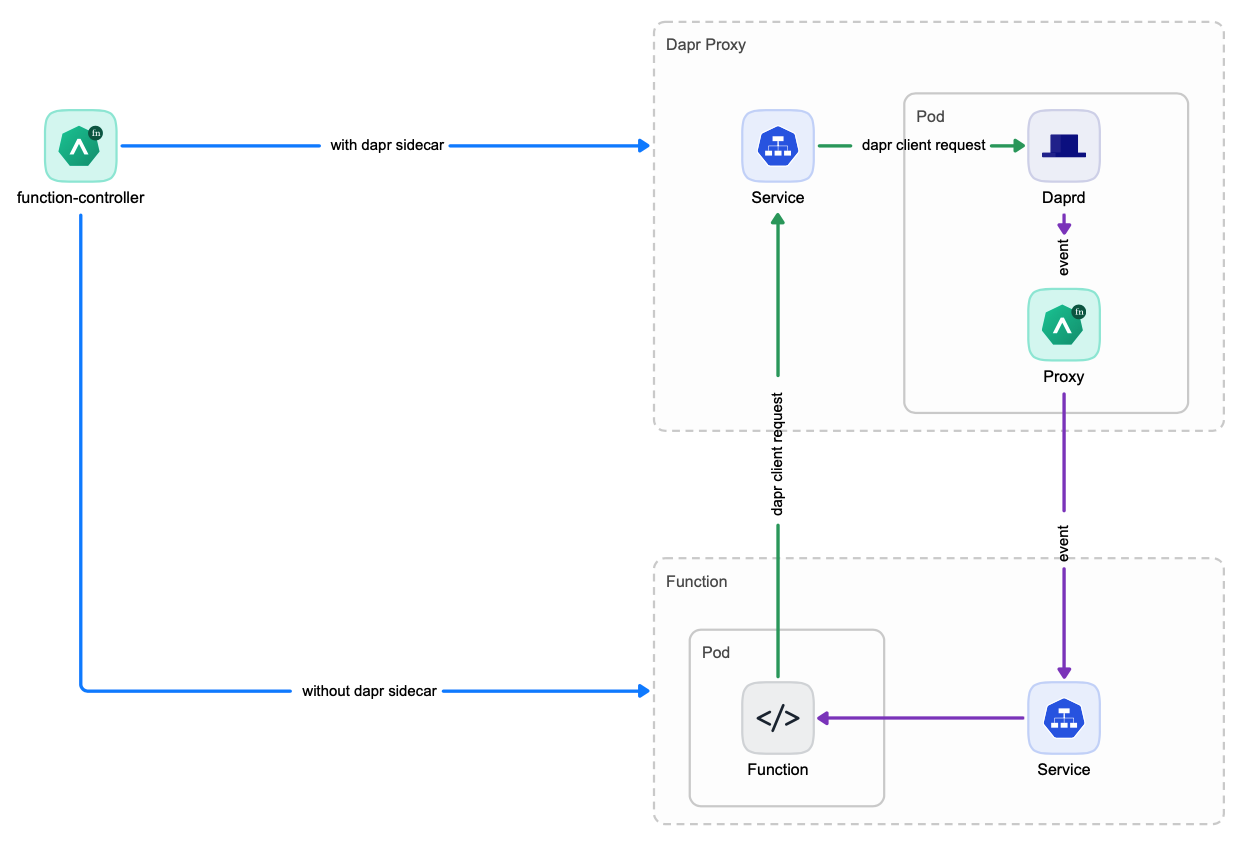
In Dapr standalone mode, one Dapr Proxy service will be created for each function which is then shared by all instances of this function. This way, there is no need to launch a seperate Dapr sidecar container for each function instance anymore which reduces the function launching time significantly.
Choose the appropriate Dapr Service Mode
So now you’ve 2 options to integrate with BaaS:
Dapr Sidecar ModeDapr Standalone Mode
You can choose the appropriate Dapr Service Mode for your functions. The Dapr Standalone Mode is the recommened and default mode. You can use Dapr Sidecar Mode if your function doesn’t scale frequently or you’ve difficulty to use the Dapr Standalone Mode.
You can control how to integrate with BaaS with 2 flags, both can be set in function’s spec.serving.annotations:
openfunction.io/enable-daprcan be set totrueorfalseopenfunction.io/dapr-service-modecan be set tostandaloneorsidecar- When
openfunction.io/enable-dapris set totrue, users can choose theDapr Service Modeby settingopenfunction.io/dapr-service-modetostandaloneorsidecar. - When
openfunction.io/enable-dapris set tofalse, the value ofopenfunction.io/dapr-service-modewill be ignored and neitherDapr SidecarnorDapr Proxy Servicewill be launched.
There’re default values for both of these two flags if they’re not set.
- The value of
openfunction.io/enable-daprwill be set totrueif it’s not defined inspec.serving.annotationsand the function definition contains eitherspec.serving.inputsorspec.serving.outputs. Otherwise it will be set tofalse. - The default value of
openfunction.io/dapr-service-modeisstandaloneif not set.
Below you can find a function example to set these two flags:
apiVersion: core.openfunction.io/v1beta2
kind: Function
metadata:
  name: cron-input-kafka-output
spec:
  version: "v2.0.0"
  image: openfunctiondev/cron-input-kafka-output:v1
  imageCredentials:
    name: push-secret
  build:
    builder: openfunction/builder-go:latest
    env:
      FUNC_NAME: "HandleCronInput"
      FUNC_CLEAR_SOURCE: "true"
    srcRepo:
      url: "https://github.com/OpenFunction/samples.git"
      sourceSubPath: "functions/async/bindings/cron-input-kafka-output"
      revision: "main"
  serving:
    annotations:
      openfunction.io/enable-dapr: "true"
      openfunction.io/dapr-service-mode: "standalone"
    template:
      containers:
        - name: function # DO NOT change this
          imagePullPolicy: IfNotPresent
    triggers:
      dapr:
        - name: cron
          type: bindings.cron
    outputs:
      - dapr:
          component: kafka-server
          operation: "create"
    bindings:
      cron:
        type: bindings.cron
        version: v1
        metadata:
        - name: schedule
          value: "@every 2s"
      kafka-server:
        type: bindings.kafka
        version: v1
        metadata:
        - name: brokers
          value: "kafka-server-kafka-brokers:9092"
        - name: topics
          value: "sample-topic"
        - name: consumerGroup
          value: "bindings-with-output"
        - name: publishTopic
          value: "sample-topic"
        - name: authRequired
          value: "false"
3.11 - Networking
3.11.1 - Introduction
Overview
Previously starting from v0.5.0, OpenFunction uses Kubernetes Ingress to provide unified entrypoints for sync functions, and a nginx ingress controller has to be installed.
With the maturity of Kubernetes Gateway API, we decided to implement OpenFunction Gateway based on the Kubernetes Gateway API to replace the previous ingress based domain method in OpenFunction v0.7.0.
You can find the OpenFunction Gateway proposal here
OpenFunction Gateway provides a more powerful and more flexible function gateway including features like:
Enable users to switch to any gateway implementations that support Kubernetes Gateway API such as Contour, Istio, Apache APISIX, Envoy Gateway (in the future) and more in an easier and vendor-neutral way.
Users can choose to install a default gateway implementation (Contour) and then define a new
gateway.networking.k8s.ioor use any existing gateway implementations in their environment and then reference an existinggateway.networking.k8s.io.Allow users to customize their own function access pattern like
hostTemplate: "{{.Name}}.{{.Namespace}}.{{.Domain}}"for host-based access.Allow users to customize their own function access pattern like
pathTemplate: "{{.Namespace}}/{{.Name}}"for path-based access.Allow users to customize each function’s route rules (host-based, path-based or both) in function definition and default route rules are provided for each function if there’re no customized route rules defined.
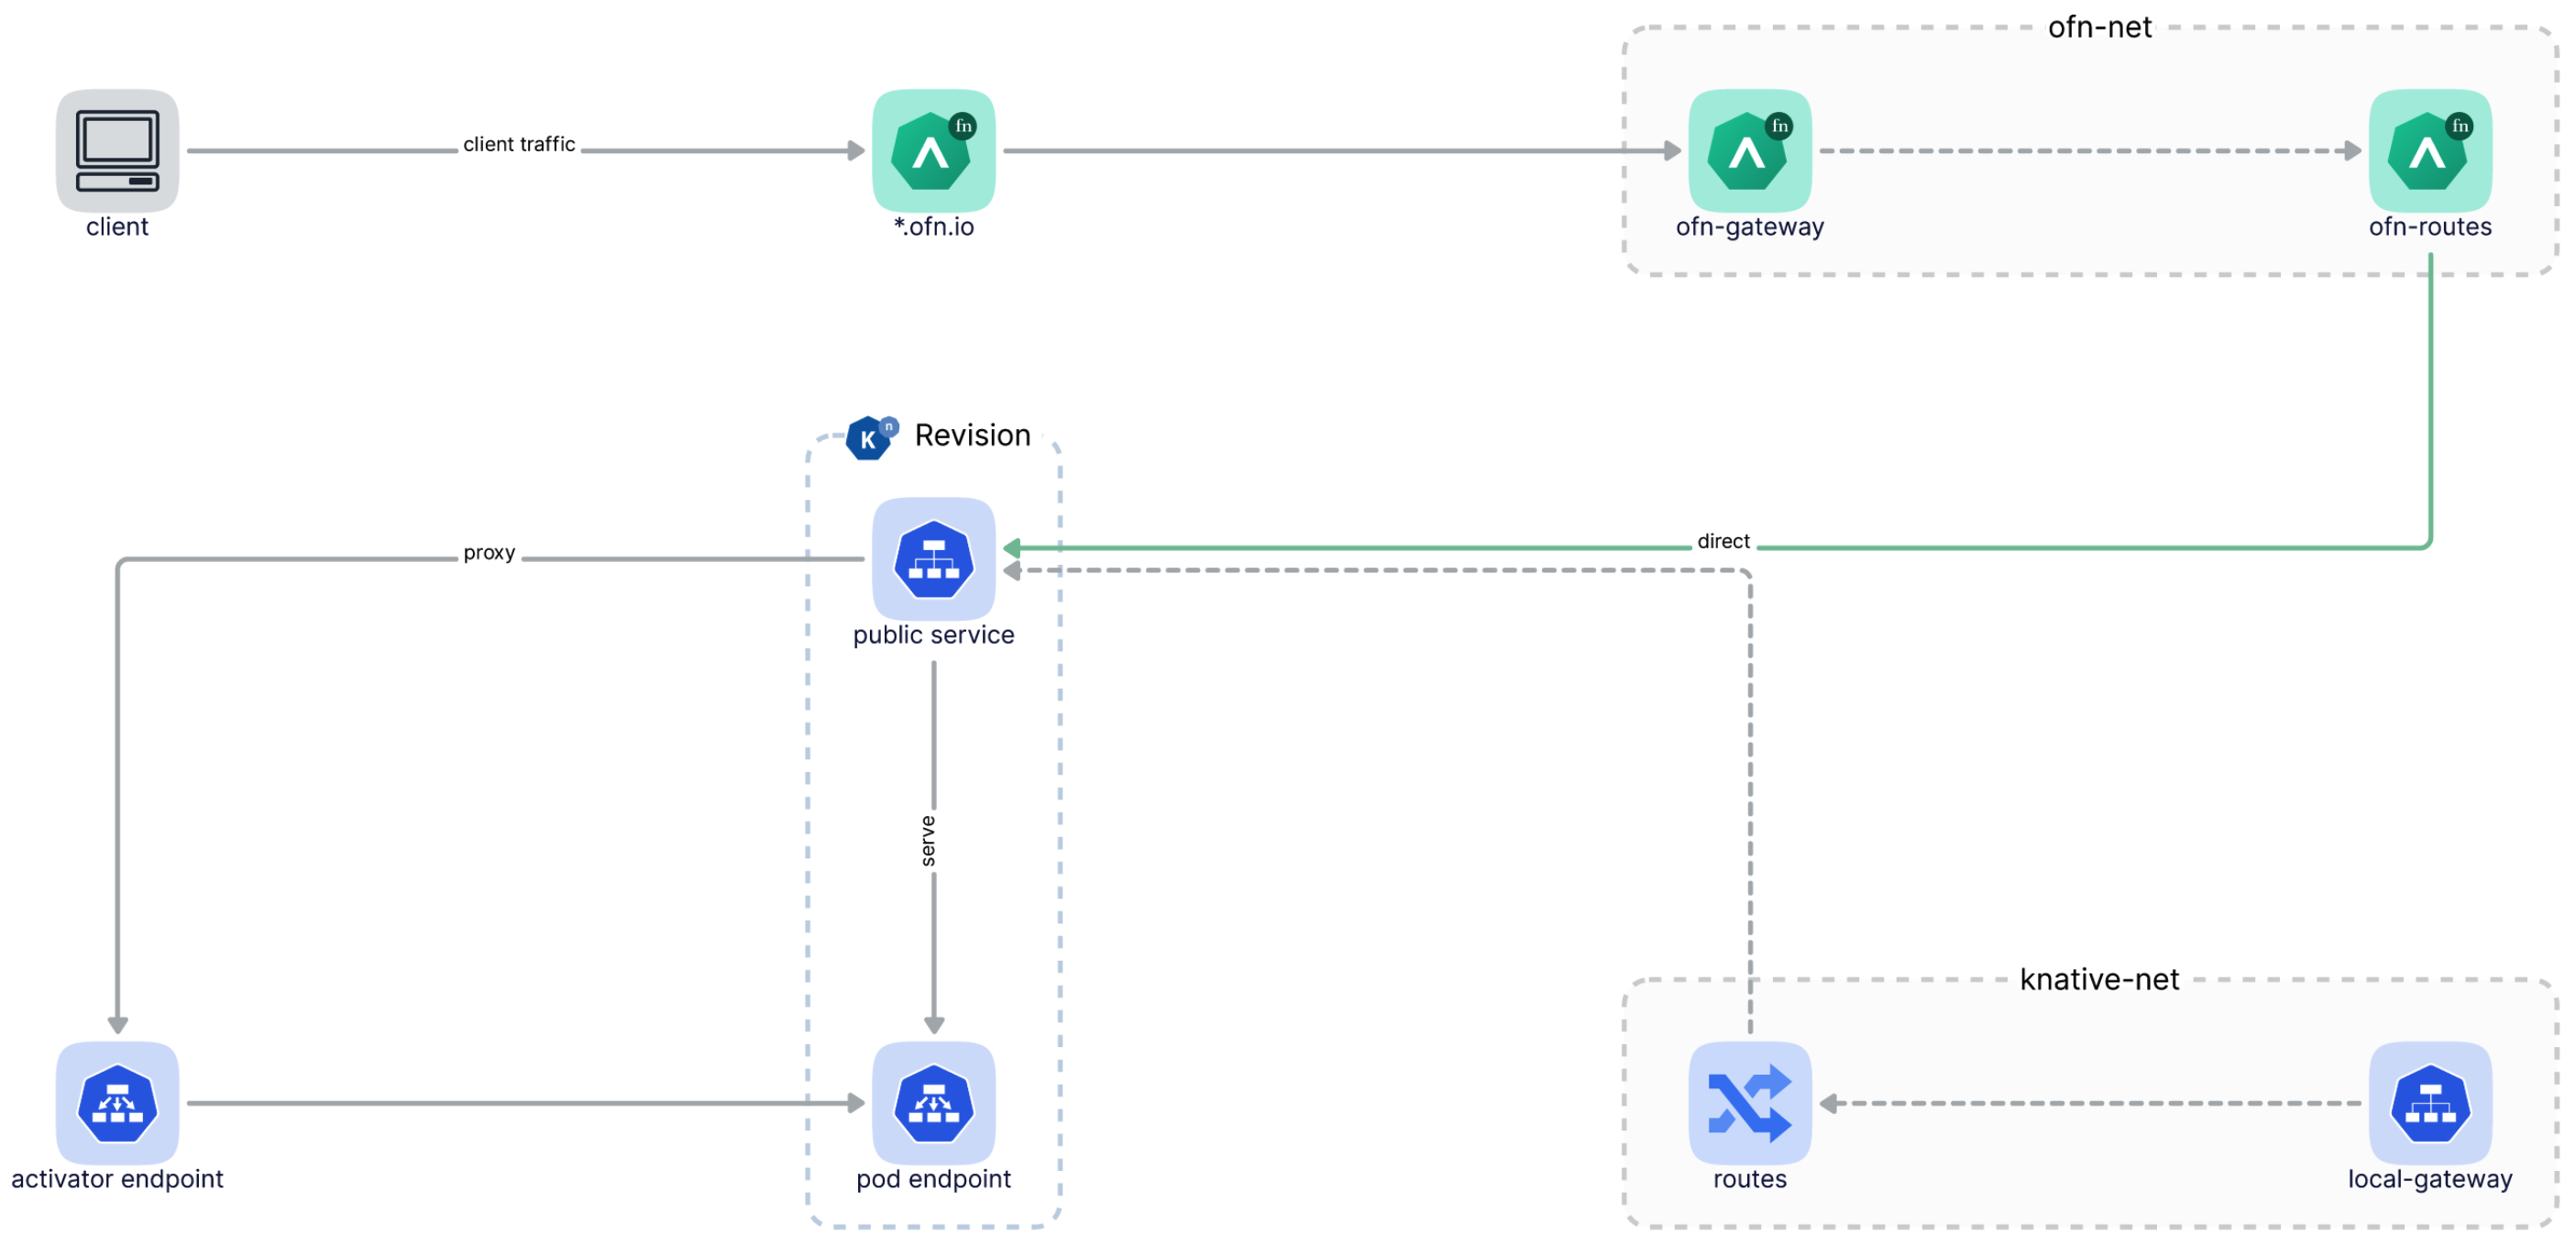
Send traffic to Knative service revisions directly without going through Knative’s own gateway anymore. You will need only OpenFunction Gateway since OpenFunction 0.7.0 to access OpenFunction sync functions, and you can ignore Knative’s domain config errors if you do not need to access Knative service directly.
Traffic splitting between function revisions (in the future)
The following diagram illustrates how client traffics go through OpenFunction Gateway and then reach a function directly:
3.11.2 - OpenFunction Gateway
Inside OpenFunction Gateway
Backed by the Kubernetes Gateway, an OpenFunction Gateway defines how users can access sync functions.
Whenever an OpenFunction Gateway is created, the gateway controller will:
Add a default listener named
ofn-http-internaltogatewaySpec.listenersif there isn’t one there.Generate
gatewaySpec.listeners.[*].hostnamebased ondomainorclusterDomain.Inject
gatewaySpec.listentersto the existingKubernetes Gatewaydefined by thegatewayRefof theOpenFunction Gateway.Create an new
Kubernetes Gatewaybased on thegatewaySpec.listentersfield ingatewayDefof theOpenFunction Gateway.Create a service named
gateway.openfunction.svc.cluster.localthat defines a unified entry for sync functions.
After an OpenFunction Gateway is deployed, you’ll be able to find the status of Kubernetes Gateway and its listeners in OpenFunction Gateway status:
status:
  conditions:
  - message: Gateway is scheduled
    reason: Scheduled
    status: "True"
    type: Scheduled
  - message: Valid Gateway
    reason: Valid
    status: "True"
    type: Ready
  listeners:
  - attachedRoutes: 0
    conditions:
    - message: Valid listener
      reason: Ready
      status: "True"
      type: Ready
    name: ofn-http-internal
    supportedKinds:
    - group: gateway.networking.k8s.io
      kind: HTTPRoute
  - attachedRoutes: 0
    conditions:
    - message: Valid listener
      reason: Ready
      status: "True"
      type: Ready
    name: ofn-http-external
    supportedKinds:
    - group: gateway.networking.k8s.io
      kind: HTTPRoute
The Default OpenFunction Gateway
OpenFunction Gateway uses Contour as the default Kubernetes Gateway implementation.
The following OpenFunction Gateway will be created automatically once you install OpenFunction:
apiVersion: networking.openfunction.io/v1alpha1
kind: Gateway
metadata:
  name: openfunction
  namespace: openfunction
spec:
  domain: ofn.io
  clusterDomain: cluster.local
  hostTemplate: "{{.Name}}.{{.Namespace}}.{{.Domain}}"
  pathTemplate: "{{.Namespace}}/{{.Name}}"
  httpRouteLabelKey: "app.kubernetes.io/managed-by"
  gatewayRef:
    name: contour
    namespace: projectcontour
  gatewaySpec:
    listeners:
      - name: ofn-http-internal
        hostname: "*.cluster.local"
        protocol: HTTP
        port: 80
        allowedRoutes:
          namespaces:
            from: All
      - name: ofn-http-external
        hostname: "*.ofn.io"
        protocol: HTTP
        port: 80
        allowedRoutes:
          namespaces:
            from: All
You can customize the default OpenFunction Gateway like below:
kubectl edit gateway openfunction -n openfunction
Switch to a different Kubernetes Gateway
You can switch to any gateway implementations that support Kubernetes Gateway API such as Contour, Istio, Apache APISIX, Envoy Gateway (in the future) and more in an easier and vendor-neutral way.
Here you can find more details.
Multiple OpenFunction Gateway
Multiple Gateway are meaningless for OpenFunction, we currently only support one OpenFunction Gateway.
3.11.3 - Route
What is Route?
Route is part of the Function definition. Route defines how traffic from the Gateway listener is routed to a function.
A Route specifies the Gateway to which it will attach in GatewayRef that allows it to receive traffic from the Gateway.
Once a sync Function is created, the function controller will:
- Look for the
Gatewaycalledopenfunctioninopenfunctionnamespace, then attach to thisGatewayifroute.gatewayRefis not defined in the function. - Automatically generate
route.hostnamesbased onGateway.spec.hostTemplate, ifroute.hostnamesis not defined in function. - Automatically generate
route.rulesbased onGateway.spec.pathTemplateor path of/, ifroute.rulesis not defined in function. - a
HTTPRoutecustom resource will be created based onRoute.BackendRefswill be automatically link to the corresponding Knative service revision and labelHTTPRouteLabelKeywill be added to thisHTTPRoute. - Create service
{{.Name}}.{{.Namespace}}.svc.cluster.local, this service defines an entry for the function to access within the cluster. - If the
Gatewayreferenced byroute.gatewayRefchanged, will update theHTTPRoute.
After a sync Function is deployed, you’ll be able to find Function addresses and Route status in Function’s status field, e.g:
status:
  addresses:
    - type: External
      value: http://function-sample-serving-only.default.ofn.io/
    - type: Internal
      value: http://function-sample-serving-only.default.svc.cluster.local/
  build:
    resourceHash: "14903236521345556383"
    state: Skipped
  route:
    conditions:
      - message: Valid HTTPRoute
        reason: Valid
        status: "True"
        type: Accepted
    hosts:
      - function-sample-serving-only.default.ofn.io
      - function-sample-serving-only.default.svc.cluster.local
    paths:
      - type: PathPrefix
        value: /
  serving:
    lastSuccessfulResourceRef: serving-znk54
    resourceHash: "10715302888241374768"
    resourceRef: serving-znk54
    service: serving-znk54-ksvc-nbg6f
    state: Running
Note
The Address of type Internal in Funtion.status provides the default method for accessing functions from within the cluster.
This internal address is not affected by the Gateway referenced by route.gatewayRef and it’s suitable for use as sink.url of EventSource.
The Address of type External in Funtion.status provides methods for accessing functions from outside the cluster (You can choose to configure Magic DNS or real DNS, please refer to access functions by the external address for more details).
This external address is generated based on route.gatewayRef, router.hostnames and route.rules. The routing mode only takes effect on this external address, The following documentation will explain how it works.
For more information about how to access functions, please refer to Function Entrypoints.
Host Based Routing
Host-based is the default routing mode. When route.hostnames is not defined,
route.hostnames will be generated based on gateway.spec.hostTemplate.
If route.rules is not defined, route.rules will be generated based on path of /.
kubectl apply -f - <<EOF
apiVersion: core.openfunction.io/v1beta2
kind: Function
metadata:
  name: function-sample
spec:
  version: "v1.0.0"
  image: "openfunctiondev/v1beta1-http:latest"
  serving:
    template:
      containers:
        - name: function
          imagePullPolicy: Always
    triggers:
      http:
        route:
          gatewayRef:
            name: openfunction
            namespace: openfunction
EOF
If you are using the default OpenFunction Gateway, the function external address will be as below:
http://function-sample.default.ofn.io/
Path Based Routing
If you define route.hostnames in a function, route.rules will be generated based on gateway.spec.pathTemplate.
kubectl apply -f - <<EOF
apiVersion: core.openfunction.io/v1beta2
kind: Function
metadata:
  name: function-sample
spec:
  version: "v1.0.0"
  image: "openfunctiondev/v1beta1-http:latest"
  serving:
    template:
      containers:
        - name: function
          imagePullPolicy: Always
    triggers:
      http:
        route:
          gatewayRef:
            name: openfunction
            namespace: openfunction
           hostnames:
           - "sample.ofn.io"
EOF
If you are using the default OpenFunction Gateway, the function external address will be as below:
http://sample.default.ofn.io/default/function-sample/
Host and Path based routing
You can define hostname and path at the same time to customize how traffic should be routed to your function.
Note
In this mode, you’ll need to resolve possible conflicts between HTTPRoutes by yourself.kubectl apply -f - <<EOF
apiVersion: core.openfunction.io/v1beta2
kind: Function
metadata:
name: function-sample
spec:
version: "v1.0.0"
image: "openfunctiondev/v1beta1-http:latest"
serving:
template:
containers:
- name: function
imagePullPolicy: Always
triggers:
http:
route:
gatewayRef:
name: openfunction
namespace: openfunction
rules:
- matches:
- path:
type: PathPrefix
value: /v2/foo
hostnames:
- "sample.ofn.io"
EOF
If you are using the default OpenFunction Gateway, the function external address will be as below:
http://sample.default.ofn.io/v2/foo/
3.11.4 - Function Entrypoints
There are several methods to access a sync function. Let’s elaborate on this in the following section.
This documentation will assume you are using default OpenFunction Gateway and you have a sync function named
function-sample.
Access functions from within the cluster
Access functions by the internal address
OpenFunction will create this service for every sync Function: {{.Name}}.{{.Namespace}}.svc.cluster.local. This service will be used to provide the Function internal address.
Get Function internal address by running following command:
export FUNC_INTERNAL_ADDRESS=$(kubectl get function function-sample -o=jsonpath='{.status.addresses[?(@.type=="Internal")].value}')
This address provides the default method for accessing functions within the cluster, it’s suitable for use as sink.url of EventSource.
Access Function using curl in pod:
kubectl run --rm ofn-test -i --tty --image=radial/busyboxplus:curl -- curl -sv $FUNC_INTERNAL_ADDRESS
Access functions from outside the cluster
Access functions by the Kubernetes Gateway’s IP address
Get Kubernetes Gateway’s ip address:
export IP=$(kubectl get node -l "! node.kubernetes.io/exclude-from-external-load-balancers" -o=jsonpath='{.items[0].status.addresses[?(@.type=="InternalIP")].address}')
Get Function’s HOST and PATH:
export FUNC_HOST=$(kubectl get function function-sample -o=jsonpath='{.status.route.hosts[0]}')
export FUNC_PATH=$(kubectl get function function-sample -o=jsonpath='{.status.route.paths[0].value}')
Access Function using curl directly:
curl -sv -HHOST:$FUNC_HOST http://$IP$FUNC_PATH
Access functions by the external address
To access a sync function by the external address, you’ll need to configure DNS first. Either Magic DNS or real DNS works:
Magic DNS
Get Kubernetes Gateway’s ip address:
export IP=$(kubectl get node -l "! node.kubernetes.io/exclude-from-external-load-balancers" -o=jsonpath='{.items[0].status.addresses[?(@.type=="InternalIP")].address}')Replace domain defined in OpenFunction Gateway with Magic DNS:
export DOMAIN="$IP.sslip.io"
kubectl patch gateway.networking.openfunction.io/openfunction -n openfunction --type merge --patch '{"spec": {"domain": "'$DOMAIN'"}}'
Then, you can see
Functionexternal address inFunction’s status field:kubectl get function function-sample -oyamlstatus: addresses: - type: External value: http://function-sample.default.172.31.73.53.sslip.io/ - type: Internal value: http://function-sample.default.svc.cluster.local/ build: resourceHash: "14903236521345556383" state: Skipped route: conditions: - message: Valid HTTPRoute reason: Valid status: "True" type: Accepted hosts: - function-sample.default.172.31.73.53.sslip.io - function-sample.default.svc.cluster.local paths: - type: PathPrefix value: / serving: lastSuccessfulResourceRef: serving-t56fq resourceHash: "2638289828407595605" resourceRef: serving-t56fq service: serving-t56fq-ksvc-bv8ng state: RunningReal DNS
If you have an external IP address, you can configure a wildcard A record as your domain:
# Here example.com is the domain defined in OpenFunction Gateway
*.example.com == A <external-ip>
If you have a CNAME, you can configure a CNAME record as your domain:
# Here example.com is the domain defined in OpenFunction Gateway
*.example.com == CNAME <external-name>
Replace domain defined in OpenFunction Gateway with the domain you configured above:
export DOMAIN="example.com"
kubectl patch gateway.networking.openfunction.io/openfunction -n openfunction --type merge --patch '{"spec": {"domain": "'$DOMAIN'"}}'
Then, you can see
Functionexternal address inFunction’s status field:kubectl get function function-sample -oyamlstatus: addresses: - type: External value: http://function-sample.default.example.com/ - type: Internal value: http://function-sample.default.svc.cluster.local/ build: resourceHash: "14903236521345556383" state: Skipped route: conditions: - message: Valid HTTPRoute reason: Valid status: "True" type: Accepted hosts: - function-sample.default.example.com - function-sample.default.svc.cluster.local paths: - type: PathPrefix value: / serving: lastSuccessfulResourceRef: serving-t56fq resourceHash: "2638289828407595605" resourceRef: serving-t56fq service: serving-t56fq-ksvc-bv8ng state: Running
Then, you can get Function external address by running following command:
export FUNC_EXTERNAL_ADDRESS=$(kubectl get function function-sample -o=jsonpath='{.status.addresses[?(@.type=="External")].value}')
Now, you can access Function using curl directly:
curl -sv $FUNC_EXTERNAL_ADDRESS
3.12 - CI/CD
Overview
Previously users can use OpenFunction to build function or application source code into container images and then deploy the built image directly to the underlying sync/async Serverless runtime without user intervention.
But OpenFunction can neither rebuild the image and then redeploy it whenever the function or application source code changes nor redeploy the image whenever this image changes (When the image is built and pushed manually or in another function)
Starting from v1.0.0, OpenFunction adds the ability to detect source code or image changes and then rebuilt and/or redeploy the new built image in a new component called Revision Controller. The Revision Controller is able to:
- Detect source code changes in github, gitlab or gitee, then rebuild and redeploy the new built image whenever the source code changes.
- Detect the bundle container image (image containing the source code) changes, then rebuild and redeploy the new built image whenever the bundle image changes.
- Detect the function or application image changes, then redeploy the new image whenever the function or application image changes.
Quick start
Install Revision Controller
You can enable Revision Controller when installing OpenFunction by simply adding the following flag to the helm command.
--set revisionController.enable=true
You can also enable Revision Controller after OpenFunction is installed:
kubectl apply -f https://raw.githubusercontent.com/OpenFunction/revision-controller/release-1.0/deploy/bundle.yaml
The
Revision Controllerwill be installed to theopenfunctionnamespace by default. You can downloadbundle.yamland change the namespace manually if you want to install it to another namespace.
Detect source code or image changes
To detect source code or image changes, you’ll need to add revision controller switch and params like below to a function’s annotation.
apiVersion: core.openfunction.io/v1beta2
kind: Function
metadata:
  annotations:
    openfunction.io/revision-controller: enable
    openfunction.io/revision-controller-params: |
      type: source
      repo-type: github
      polling-interval: 1m
  name: function-http-java
  namespace: default
spec:
  build:
    ...
  serving:
    ...
Annotations
| Key | Description |
|---|---|
| openfunction.io/revision-controller | Whether to enable revision controller to detect source code or image changes for this function, can be set to either enable or disable. |
| openfunction.io/revision-controller-params | Parameters for revision controller. |
Parameters
| Name | Description |
|---|---|
| type | The change type to detect including source, source-image, and image. |
| polling-interval | The interval to polling the image digest or source code head. |
| repo-type | The type of the git repo including github, gitlab, and gitee. Default to github. |
| base-url | The base url of the gitlab server. |
| auth-type | The auth type of the gitlab server. |
| project-id | The project id of a gitlab repo. |
| insecure-registry | If the image registy is insecure, you should set this to true. |
3.13 - OpenFunction Events
3.13.1 - Introduction
Overview
OpenFunction Events is OpenFunction’s event management framework. It provides the following core features:
- Support for triggering target functions by synchronous and asynchronous calls
- User-defined trigger judgment logic
- The components of OpenFunction Events can be driven by OpenFunction itself
Architecture
The following diagram illustrates the architecture of OpenFunction Events.

Concepts
EventSource
EventSource defines the producer of an event, such as a Kafka service, an object storage service, and even a function. It contains descriptions of these event producers and information about where to send these events.
EventSource supports the following types of event source server:
- Kafka
- Cron (scheduler)
- Redis
EventBus (ClusterEventBus)
EventBus is responsible for aggregating events and making them persistent. It contains descriptions of an event bus broker that usually is a message queue (such as NATS Streaming and Kafka), and provides these configurations for EventSource and Trigger.
EventBus handles event bus adaptation for namespace scope by default. For cluster scope, ClusterEventBus is available as an event bus adapter and takes effect when other components cannot find an EventBus under a namespace.
EventBus supports the following event bus broker:
- NATS Streaming
Trigger
Trigger is an abstraction of the purpose of an event, such as what needs to be done when a message is received. It contains the purpose of an event defined by you, which tells the trigger which EventSource it should fetch the event from and subsequently determine whether to trigger the target function according to the given conditions.
Reference
For more information, see EventSource Specifications and EventBus Specifications.
3.13.2 - Use EventSource
This document gives an example of how to use an event source to trigger a synchronous function.
In this example, an EventSource is defined for synchronous invocation to use the event source (a Kafka server) as an input bindings of a function (a Knative service). When the event source generates an event, it will invoke the function and get a synchronous return through the spec.sink configuration.
Create a Function
Use the following content to create a function as the EventSource Sink. For more information about how to create a function, see Create sync functions.
apiVersion: core.openfunction.io/v1beta2
kind: Function
metadata:
  name: sink
spec:
  version: "v1.0.0"
  image: "openfunction/sink-sample:latest"
  serving:
    template:
      containers:
        - name: function
          imagePullPolicy: Always
    triggers:
      http:
        port: 8080
After the function is created, run the following command to get the URL of the function.
Note
In the URL of the function, theopenfunction is the name of the Kubernetes Service and the io is the namespace where the Kubernetes Service runs. For more information, see Namespaces of Services.$ kubectl get functions.core.openfunction.io
NAME BUILDSTATE SERVINGSTATE BUILDER SERVING URL AGE
sink Skipped Running serving-4x5wh https://openfunction.io/default/sink 13s
Create a Kafka Cluster
Run the following commands to install strimzi-kafka-operator in the default namespace.
helm repo add strimzi https://strimzi.io/charts/
helm install kafka-operator -n default strimzi/strimzi-kafka-operator
Use the following content to create a file
kafka.yaml.apiVersion: kafka.strimzi.io/v1beta2 kind: Kafka metadata: name: kafka-server namespace: default spec: kafka: version: 3.3.1 replicas: 1 listeners: - name: plain port: 9092 type: internal tls: false - name: tls port: 9093 type: internal tls: true config: offsets.topic.replication.factor: 1 transaction.state.log.replication.factor: 1 transaction.state.log.min.isr: 1 default.replication.factor: 1 min.insync.replicas: 1 inter.broker.protocol.version: "3.1" storage: type: ephemeral zookeeper: replicas: 1 storage: type: ephemeral entityOperator: topicOperator: {} userOperator: {} --- apiVersion: kafka.strimzi.io/v1beta2 kind: KafkaTopic metadata: name: events-sample namespace: default labels: strimzi.io/cluster: kafka-server spec: partitions: 10 replicas: 1 config: retention.ms: 7200000 segment.bytes: 1073741824Run the following command to deploy a 1-replica Kafka server named
kafka-serverand 1-replica Kafka topic namedevents-samplein the default namespace. The Kafka and Zookeeper clusters created by this command have a storage type of ephemeral and are demonstrated using emptyDir.kubectl apply -f kafka.yamlRun the following command to check pod status and wait for Kafka and Zookeeper to be up and running.
$ kubectl get po
NAME                                              READY   STATUS        RESTARTS   AGE
kafka-server-entity-operator-568957ff84-nmtlw     3/3     Running       0          8m42s
kafka-server-kafka-0                              1/1     Running       0          9m13s
kafka-server-zookeeper-0                          1/1     Running       0          9m46s
strimzi-cluster-operator-687fdd6f77-cwmgm         1/1     Running       0          11m
Run the following command to view the metadata of the Kafka cluster.
kafkacat -L -b kafka-server-kafka-brokers:9092
Trigger a Synchronous Function
Create an EventSource
Use the following content to create an EventSource configuration file (for example,
eventsource-sink.yaml).Note
- The following example defines an event source named
my-eventsourceand mark the events generated by the specified Kafka server assample-oneevents. spec.sinkreferences the target function (Knative service) created in the prerequisites.
apiVersion: events.openfunction.io/v1alpha1 kind: EventSource metadata: name: my-eventsource spec: logLevel: "2" kafka: sample-one: brokers: "kafka-server-kafka-brokers.default.svc.cluster.local:9092" topic: "events-sample" authRequired: false sink: uri: "http://openfunction.io.svc.cluster.local/default/sink"- The following example defines an event source named
Run the following command to apply the configuration file.
kubectl apply -f eventsource-sink.yamlRun the following commands to check the results.
$ kubectl get eventsources.events.openfunction.io
NAME             EVENTBUS   SINK   STATUS
my-eventsource                     Ready

$ kubectl get components
NAME                                                      AGE
serving-8f6md-component-esc-kafka-sample-one-r527t        68m
serving-8f6md-component-ts-my-eventsource-default-wz8jt   68m

$ kubectl get deployments.apps
NAME                                           READY   UP-TO-DATE   AVAILABLE   AGE
serving-8f6md-deployment-v100-pg9sd            1/1     1            1           68m
Note
In this example of triggering a synchronous function, the workflow of the EventSource controller is described as follows:
- Create an EventSource custom resource named
my-eventsource. - Create a Dapr component named
serving-xxxxx-component-esc-kafka-sample-one-xxxxxto enable the EventSource to associate with the event source. - Create a Dapr component named
serving-xxxxx-component-ts-my-eventsource-default-xxxxxenable the EventSource to associate with the sink function. - Create a Deployment named
serving-xxxxx-deployment-v100-xxxxx-xxxxxxxxxx-xxxxxfor processing events.
- Create an EventSource custom resource named
Create an event producer
To start the target function, you need to create some events to trigger the function.
Use the following content to create an event producer configuration file (for example,
events-producer.yaml).apiVersion: core.openfunction.io/v1beta1 kind: Function metadata: name: events-producer spec: version: "v1.0.0" image: openfunctiondev/v1beta1-bindings:latest serving: template: containers: - name: function imagePullPolicy: Always runtime: "async" inputs: - name: cron component: cron outputs: - name: target component: kafka-server operation: "create" bindings: cron: type: bindings.cron version: v1 metadata: - name: schedule value: "@every 2s" kafka-server: type: bindings.kafka version: v1 metadata: - name: brokers value: "kafka-server-kafka-brokers:9092" - name: topics value: "events-sample" - name: consumerGroup value: "bindings-with-output" - name: publishTopic value: "events-sample" - name: authRequired value: "false"Run the following command to apply the configuration file.
kubectl apply -f events-producer.yamlRun the following command to check the results in real time.
$ kubectl get po --watch
NAME                                                           READY   STATUS              RESTARTS   AGE
serving-k6zw8-deployment-v100-fbtdc-dc96c4589-s25dh            0/2     ContainerCreating   0          1s
serving-8f6md-deployment-v100-pg9sd-6666c5577f-4rpdg           2/2     Running             0          23m
serving-k6zw8-deployment-v100-fbtdc-dc96c4589-s25dh            0/2     ContainerCreating   0          1s
serving-k6zw8-deployment-v100-fbtdc-dc96c4589-s25dh            1/2     Running             0          5s
serving-k6zw8-deployment-v100-fbtdc-dc96c4589-s25dh            2/2     Running             0          8s
serving-4x5wh-ksvc-wxbf2-v100-deployment-5c495c84f6-8n6mk      0/2     Pending             0          0s
serving-4x5wh-ksvc-wxbf2-v100-deployment-5c495c84f6-8n6mk      0/2     Pending             0          0s
serving-4x5wh-ksvc-wxbf2-v100-deployment-5c495c84f6-8n6mk      0/2     ContainerCreating   0          0s
serving-4x5wh-ksvc-wxbf2-v100-deployment-5c495c84f6-8n6mk      0/2     ContainerCreating   0          2s
serving-4x5wh-ksvc-wxbf2-v100-deployment-5c495c84f6-8n6mk      1/2     Running             0          4s
serving-4x5wh-ksvc-wxbf2-v100-deployment-5c495c84f6-8n6mk      1/2     Running             0          4s
serving-4x5wh-ksvc-wxbf2-v100-deployment-5c495c84f6-8n6mk      2/2     Running             0          4s
3.13.3 - Use EventBus and Trigger
This document gives an example of how to use EventBus and Trigger.
Prerequisites
- You need to create a function as the target function to be triggered. Please refer to Create a function for more details.
- You need to create a Kafka cluster. Please refer to Create a Kafka cluster for more details.
Deploy an NATS streaming server
Run the following commands to deploy an NATS streaming server. This document uses nats://nats.default:4222 as the access address of the NATS streaming server and stan as the cluster ID. For more information, see NATS Streaming (STAN).
helm repo add nats https://nats-io.github.io/k8s/helm/charts/
helm install nats nats/nats
helm install stan nats/stan --set stan.nats.url=nats://nats:4222
Create an OpenFuncAsync Runtime Function
Use the following content to create a configuration file (for example,
openfuncasync-function.yaml) for the target function, which is triggered by the Trigger CRD and prints the received message.apiVersion: core.openfunction.io/v1beta2 kind: Function metadata: name: trigger-target spec: version: "v1.0.0" image: openfunctiondev/v1beta1-trigger-target:latest serving: scaleOptions: keda: scaledObject: pollingInterval: 15 minReplicaCount: 0 maxReplicaCount: 10 cooldownPeriod: 30 triggers: - type: stan metadata: natsServerMonitoringEndpoint: "stan.default.svc.cluster.local:8222" queueGroup: "grp1" durableName: "ImDurable" subject: "metrics" lagThreshold: "10" triggers: dapr: - name: eventbus topic: metrics pubsub: eventbus: type: pubsub.natsstreaming version: v1 metadata: - name: natsURL value: "nats://nats.default:4222" - name: natsStreamingClusterID value: "stan" - name: subscriptionType value: "queue" - name: durableSubscriptionName value: "ImDurable" - name: consumerID value: "grp1"Run the following command to apply the configuration file.
kubectl apply -f openfuncasync-function.yaml
Create an EventBus and an EventSource
Use the following content to create a configuration file (for example,
eventbus.yaml) for an EventBus.apiVersion: events.openfunction.io/v1alpha1 kind: EventBus metadata: name: default spec: natsStreaming: natsURL: "nats://nats.default:4222" natsStreamingClusterID: "stan" subscriptionType: "queue" durableSubscriptionName: "ImDurable"Use the following content to create a configuration file (for example,
eventsource.yaml) for an EventSource.Note
Set the name of the event bus throughspec.eventBus.apiVersion: events.openfunction.io/v1alpha1 kind: EventSource metadata: name: my-eventsource spec: logLevel: "2" eventBus: "default" kafka: sample-two: brokers: "kafka-server-kafka-brokers.default.svc.cluster.local:9092" topic: "events-sample" authRequired: falseRun the following commands to apply these configuration files.
kubectl apply -f eventbus.yaml
kubectl apply -f eventsource.yaml
Run the following commands to check the results.
$ kubectl get eventsources.events.openfunction.io
NAME             EVENTBUS   SINK   STATUS
my-eventsource   default           Ready

$ kubectl get eventbus.events.openfunction.io
NAME      AGE
default   6m53s

$ kubectl get components
NAME                                                 AGE
serving-6r5dl-component-eventbus-jlpqf               11m
serving-9689d-component-ebfes-my-eventsource-cmcbw   6m57s
serving-9689d-component-esc-kafka-sample-two-l99cg   6m57s
serving-k6zw8-component-cron-9x8hl                   61m
serving-k6zw8-component-kafka-server-sjrzs           61m

$ kubectl get deployments.apps
NAME                                       READY   UP-TO-DATE   AVAILABLE   AGE
serving-6r5dl-deployment-v100-m7nq2        0/0     0            0           12m
serving-9689d-deployment-v100-5qdvk        1/1     1            1           7m17s
Note
In the case of using the event bus, the workflow of the EventSource controller is described as follows:
- Create an EventSource custom resource named
my-eventsource. - Retrieve and reorganize the configuration of the EventBus, including the EventBus name (
defaultin this example) and the name of the Dapr component associated with the EventBus. - Create a Dapr component named
serving-xxxxx-component-ebfes-my-eventsource-xxxxxto enable the EventSource to associate with the event bus. - Create a Dapr component named
serving-xxxxx-component-esc-kafka-sample-two-xxxxxto enable the EventSource to associate with the event source. - Create a Deployment named
serving-xxxxx-deployment-v100-xxxxxfor processing events.
- Create an EventSource custom resource named
Create a Trigger
Use the following content to create a configuration file (for example,
trigger.yaml) for a Trigger.Note
- Set the event bus associated with the Trigger through
spec.eventBus. - Set the event input source through
spec.inputs. - This is a simple trigger that collects events from the EventBus named
default. When it retrieves asample-twoevent from the EventSourcemy-eventsource, it triggers a Knative service namedfunction-sample-serving-qrdx8-ksvc-fwml8and sends the event to the topicmetricsof the event bus at the same time.
apiVersion: events.openfunction.io/v1alpha1 kind: Trigger metadata: name: my-trigger spec: logLevel: "2" eventBus: "default" inputs: inputDemo: eventSource: "my-eventsource" event: "sample-two" subscribers: - condition: inputDemo topic: "metrics"- Set the event bus associated with the Trigger through
Run the following command to apply the configuration file.
kubectl apply -f trigger.yamlRun the following commands to check the results.
$ kubectl get triggers.events.openfunction.io
NAME         EVENTBUS   STATUS
my-trigger   default    Ready

$ kubectl get eventbus.events.openfunction.io
NAME      AGE
default   62m

$ kubectl get components
NAME                                                 AGE
serving-9689d-component-ebfes-my-eventsource-cmcbw   46m
serving-9689d-component-esc-kafka-sample-two-l99cg   46m
serving-dxrhd-component-eventbus-t65q7               13m
serving-zwlj4-component-ebft-my-trigger-4925n        100s
Note
In the case of using the event bus, the workflow of the Trigger controller is as follows:
- Create a Trigger custom resource named
my-trigger. - Retrieve and reorganize the configuration of the EventBus, including the EventBus name (
defaultin this example) and the name of the Dapr component associated with the EventBus. - Create a Dapr component named
serving-xxxxx-component-ebft-my-trigger-xxxxxto enable the Trigger to associatie with the event bus. - Create a Deployment named
serving-xxxxx-deployment-v100-xxxxxfor processing trigger tasks.
- Create a Trigger custom resource named
Create an Event Producer
Use the following content to create an event producer configuration file (for example,
events-producer.yaml).apiVersion: core.openfunction.io/v1beta2 kind: Function metadata: name: events-producer spec: version: "v1.0.0" image: openfunctiondev/v1beta1-bindings:latest serving: template: containers: - name: function imagePullPolicy: Always triggers: dapr: - name: cron type: bindings.cron outputs: - dapr: name: kafka-server operation: "create" bindings: cron: type: bindings.cron version: v1 metadata: - name: schedule value: "@every 2s" kafka-server: type: bindings.kafka version: v1 metadata: - name: brokers value: "kafka-server-kafka-brokers:9092" - name: topics value: "events-sample" - name: consumerGroup value: "bindings-with-output" - name: publishTopic value: "events-sample" - name: authRequired value: "false"Run the following command to apply the configuration file.
kubectl apply -f events-producer.yamlRun the following commands to observe changes of the target asynchronous function.
$ kubectl get functions.core.openfunction.io
NAME                                  BUILDSTATE   SERVINGSTATE   BUILDER   SERVING         URL                                   AGE
trigger-target                        Skipped      Running                  serving-dxrhd                                         20m

$ kubectl get po --watch
NAME                                                     READY   STATUS              RESTARTS   AGE
serving-dxrhd-deployment-v100-xmrkq-785cb5f99-6hclm      0/2     Pending             0          0s
serving-dxrhd-deployment-v100-xmrkq-785cb5f99-6hclm      0/2     Pending             0          0s
serving-dxrhd-deployment-v100-xmrkq-785cb5f99-6hclm      0/2     ContainerCreating   0          0s
serving-dxrhd-deployment-v100-xmrkq-785cb5f99-6hclm      0/2     ContainerCreating   0          2s
serving-dxrhd-deployment-v100-xmrkq-785cb5f99-6hclm      1/2     Running             0          4s
serving-dxrhd-deployment-v100-xmrkq-785cb5f99-6hclm      1/2     Running             0          4s
serving-dxrhd-deployment-v100-xmrkq-785cb5f99-6hclm      2/2     Running             0          4s
3.13.4 - Use Multiple Sources in One EventSource
This document describes how to use multiple sources in one EventSource.
Prerequisites
- You need to create a function as the target function to be triggered. Please refer to Create a function for more details.
- You need to create a Kafka cluster. Please refer to Create a Kafka cluster for more details.
Use Multiple Sources in One EventSource
Use the following content to create an EventSource configuration file (for example,
eventsource-multi.yaml).Note
- The following example defines an event source named
my-eventsourceand mark the events generated by the specified Kafka server assample-three. spec.sinkreferences the target function (Knative service).- The configuration of
spec.cronis to trigger the function defined inspec.sinkevery 5 seconds.
apiVersion: events.openfunction.io/v1alpha1 kind: EventSource metadata: name: my-eventsource spec: logLevel: "2" kafka: sample-three: brokers: "kafka-server-kafka-brokers.default.svc.cluster.local:9092" topic: "events-sample" authRequired: false cron: sample-three: schedule: "@every 5s" sink: uri: "http://openfunction.io.svc.cluster.local/default/sink"- The following example defines an event source named
Run the following command to apply the configuration file.
kubectl apply -f eventsource-multi.yamlRun the following commands to observe changes.
$ kubectl get eventsources.events.openfunction.io
NAME             EVENTBUS   SINK   STATUS
my-eventsource                     Ready

$ kubectl get components
NAME                                                      AGE
serving-vqfk5-component-esc-cron-sample-three-dzcpv       35s
serving-vqfk5-component-esc-kafka-sample-one-nr9pq        35s
serving-vqfk5-component-ts-my-eventsource-default-q6g6m   35s

$ kubectl get deployments.apps
NAME                                       READY   UP-TO-DATE   AVAILABLE   AGE
serving-4x5wh-ksvc-wxbf2-v100-deployment   1/1     1            1           3h14m
serving-vqfk5-deployment-v100-vdmvj        1/1     1            1           48s
3.13.5 - Use ClusterEventBus
This document describes how to use a ClusterEventBus.
Prerequisites
You have finished the steps described in Use EventBus and Trigger.
Use a ClusterEventBus
Use the following content to create a ClusterEventBus configuration file (for example,
clustereventbus.yaml).apiVersion: events.openfunction.io/v1alpha1 kind: ClusterEventBus metadata: name: default spec: natsStreaming: natsURL: "nats://nats.default:4222" natsStreamingClusterID: "stan" subscriptionType: "queue" durableSubscriptionName: "ImDurable"Run the following command to delete EventBus.
kubectl delete eventbus.events.openfunction.io defaultRun the following command to apply the configuration file.
kubectl apply -f clustereventbus.yamlRun the following commands to check the results.
$ kubectl get eventbus.events.openfunction.io
No resources found in default namespace.

$ kubectl get clustereventbus.events.openfunction.io
NAME      AGE
default   21s
3.13.6 - Use Trigger Conditions
This document describes how to use Trigger conditions.
Prerequisites
You have finished the steps described in Use EventBus and Trigger.
Use Trigger Conditions
Create two event sources
Use the following content to create an EventSource configuration file (for example,
eventsource-a.yaml).apiVersion: events.openfunction.io/v1alpha1 kind: EventSource metadata: name: eventsource-a spec: logLevel: "2" eventBus: "default" kafka: sample-five: brokers: "kafka-server-kafka-brokers.default.svc.cluster.local:9092" topic: "events-sample" authRequired: falseUse the following content to create another EventSource configuration file (for example,
eventsource-b.yaml).apiVersion: events.openfunction.io/v1alpha1 kind: EventSource metadata: name: eventsource-b spec: logLevel: "2" eventBus: "default" cron: sample-five: schedule: "@every 5s"Run the following commands to apply these two configuration files.
kubectl apply -f eventsource-a.yaml
kubectl apply -f eventsource-b.yaml
Create a trigger with condition
Use the following content to create a configuration file (for example,
condition-trigger.yaml) for a Trigger withcondition.apiVersion: events.openfunction.io/v1alpha1 kind: Trigger metadata: name: condition-trigger spec: logLevel: "2" eventBus: "default" inputs: eventA: eventSource: "eventsource-a" event: "sample-five" eventB: eventSource: "eventsource-b" event: "sample-five" subscribers: - condition: eventB sink: uri: "http://openfunction.io.svc.cluster.local/default/sink" - condition: eventA && eventB topic: "metrics"Note
In this example, two input sources and two subscribers are defined, and their triggering relationship is described as follows:
- When input
eventBis received, the input event is sent to the Knative service. - When input
eventBand inputeventAare received, the input event is sent to the metrics topic of the event bus and sent to the Knative service at the same time.
- When input
Run the following commands to apply the configuration files.
kubectl apply -f condition-trigger.yamlRun the following commands to check the results.
$ kubectl get eventsources.events.openfunction.io
NAME            EVENTBUS   SINK   STATUS
eventsource-a   default           Ready
eventsource-b   default           Ready

$ kubectl get triggers.events.openfunction.io
NAME                EVENTBUS   STATUS
condition-trigger   default    Ready

$ kubectl get eventbus.events.openfunction.io
NAME      AGE
default   12s
Run the following command and you can see from the output that the
eventBcondition in the Trigger is matched and the Knative service is triggered because the event sourceeventsource-bis a cron task.$ kubectl get functions.core.openfunction.io NAME BUILDSTATE SERVINGSTATE BUILDER SERVING URL AGE sink Skipped Running serving-4x5wh https://openfunction.io/default/sink 3h25m $ kubectl get po NAME READY STATUS RESTARTS AGE serving-4x5wh-ksvc-wxbf2-v100-deployment-5c495c84f6-k2jdg 2/2 Running 0 46sCreate an event producer by referring to Create an Event Producer.
Run the following command and you can see from the output that the
eventA && eventBcondition in the Trigger is matched and the event is sent to themetricstopic of the event bus at the same time. The OpenFuncAsync function is triggered.$ kubectl get functions.core.openfunction.io NAME BUILDSTATE SERVINGSTATE BUILDER SERVING URL AGE trigger-target Skipped Running serving-7hghp 103s $ kubectl get po NAME READY STATUS RESTARTS AGE serving-7hghp-deployment-v100-z8wrf-946b4854d-svf55 2/2 Running 0 18s
4 - Operations
4.1 - Networking
4.1.1 - Switch to another Kubernetes Gateway
You can switch to any gateway implementations that support Kubernetes Gateway API such as Contour, Istio, Apache APISIX, Envoy Gateway (in the future) and more in an easier and vendor-neutral way.
For example, you can choose to use Istio as the underlying Kubernetes Gateway like this:
- Install OpenFunction without
Contour:
helm install openfunction --set global.Contour.enabled=false openfunction/openfunction -n openfunction
- Install
Istioand then enable its Knative integration:
kubectl apply -l knative.dev/crd-install=true -f https://github.com/knative/net-istio/releases/download/knative-v1.3.0/istio.yaml
kubectl apply -f https://github.com/knative/net-istio/releases/download/knative-v1.3.0/istio.yaml
kubectl apply -f https://github.com/knative/net-istio/releases/download/knative-v1.3.0/net-istio.yaml
- Create a
GatewayClassnamedistio:
kubectl apply -f - <<EOF
apiVersion: gateway.networking.k8s.io/v1alpha2
kind: GatewayClass
metadata:
  name: istio
spec:
  controllerName: istio.io/gateway-controller
  description: The default Istio GatewayClass
EOF
- Create an
OpenFunction Gateway:
kubectl apply -f - <<EOF
apiVersion: networking.openfunction.io/v1alpha1
kind: Gateway
metadata:
  name: custom-gateway
  namespace: openfunction
spec:
  domain: ofn.io
  clusterDomain: cluster.local
  hostTemplate: "{{.Name}}.{{.Namespace}}.{{.Domain}}"
  pathTemplate: "{{.Namespace}}/{{.Name}}"
  gatewayDef:
    namespace: openfunction
    gatewayClassName: istio
  gatewaySpec:
    listeners:
    - name: ofn-http-external
      protocol: HTTP
      port: 80
      allowedRoutes:
        namespaces:
          from: All
EOF
- Reference the custom
OpenFunction Gateway(Istio) in thegatewayReffield of aFunction:
kubectl apply -f - <<EOF
apiVersion: core.openfunction.io/v1beta2
kind: Function
metadata:
  name: function-sample
spec:
  version: "v1.0.0"
  image: "openfunctiondev/v1beta1-http:latest"
  serving:
    template:
      containers:
        - name: function
          imagePullPolicy: Always
    triggers:
      http:
        route:
          gatewayRef:
            name: custom-gateway
            namespace: openfunction
EOF
4.1.2 - Configure Local Domain
Configure Local Domain
By configuring the local domain, you can access functions from within a Kubernetes cluster through the function’s external address.
Configure CoreDNS based on Gateway.spec.domain
Assume you have a Gateway that defines this domain: *.ofn.io, you need to update CoreDNS configuration via following commands:
- Edit the
corednsconfigmap:
kubectl -n kube-system edit cm coredns -o yaml
- Add
rewrite stop name regex .*\.ofn\.io gateway.openfunction.svc.cluster.localto the configuration file in the.:53section, e.g:
apiVersion: v1
data:
  Corefile: |
    .:53 {
        errors
        health {
           lameduck 5s
        }
        ready
        kubernetes cluster.local in-addr.arpa ip6.arpa {
           pods insecure
           fallthrough in-addr.arpa ip6.arpa
           ttl 30
        }
        rewrite stop name regex .*\.ofn\.io gateway.openfunction.svc.cluster.local
        prometheus :9153
        forward . /etc/resolv.conf {
           max_concurrent 1000
        }
        cache 30
        loop
        reload
        loadbalance
    }
...
Configure nodelocaldns based on Gateway.spec.domain
If you are also using nodelocaldns like Kubesphere, you need to update nodelocaldns configuration by the following commands:
- Edit the
nodelocaldnsconfigmap:
kubectl -n kube-system edit cm nodelocaldns -o yaml
- Add
ofn.io:53section to the configuration file, e.g:
apiVersion: v1
data:
  Corefile: |
    ofn.io:53 {
        errors
        cache {
            success 9984 30
            denial 9984 5
        }
        reload
        loop
        bind 169.254.25.10
        forward . 10.233.0.3 {
            force_tcp
        }
        prometheus :9253
    }
    cluster.local:53 {
        errors
        cache {
            success 9984 30
            denial 9984 5
        }
        reload
        loop
        bind 169.254.25.10
        forward . 10.233.0.3 {
            force_tcp
        }
        prometheus :9253
        health 169.254.25.10:9254
    }
    .:53 {
        errors
        cache 30
        reload
        loop
        bind 169.254.25.10
        forward . /etc/resolv.conf
        prometheus :9253
    }
...
5 - Best Practices
For more examples of using OpenFunction, refer to the samples repository, such as Autoscaling service based on queue depth.
5.1 - Create a Knative-based Function to Interact with Middleware
Learn how to create a Knative-based function to interact with middleware via Dapr components.
This document describes how to create a Knative-based function to interact with middleware via Dapr components.
Overview
Similar to asynchronous functions, the functions that are based on Knative runtime can interact with middleware through Dapr components. This document uses two functions, function-front and kafka-input, for demonstration.
The following diagram illustrates the relationship between these functions.
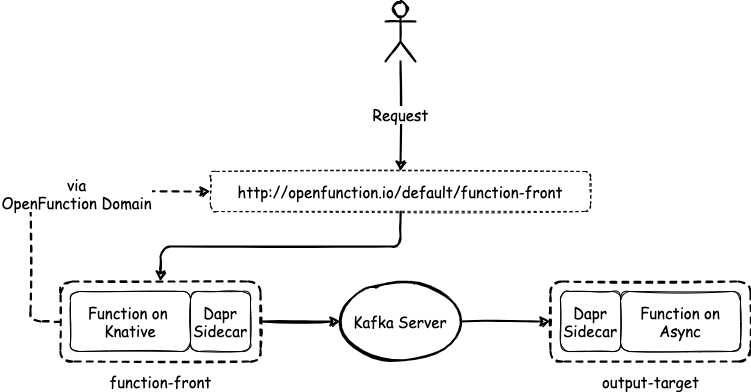
Prerequisites
- You have installed OpenFunction.
- You have created a secret.
Create a Kafka Server and Topic
Run the following commands to install strimzi-kafka-operator in the default namespace.
helm repo add strimzi https://strimzi.io/charts/
helm install kafka-operator -n default strimzi/strimzi-kafka-operator
Use the following content to create a file
kafka.yaml.apiVersion: kafka.strimzi.io/v1beta2 kind: Kafka metadata: name: kafka-server namespace: default spec: kafka: version: 3.3.1 replicas: 1 listeners: - name: plain port: 9092 type: internal tls: false - name: tls port: 9093 type: internal tls: true config: offsets.topic.replication.factor: 1 transaction.state.log.replication.factor: 1 transaction.state.log.min.isr: 1 default.replication.factor: 1 min.insync.replicas: 1 inter.broker.protocol.version: "3.1" storage: type: ephemeral zookeeper: replicas: 1 storage: type: ephemeral entityOperator: topicOperator: {} userOperator: {} --- apiVersion: kafka.strimzi.io/v1beta2 kind: KafkaTopic metadata: name: sample-topic namespace: default labels: strimzi.io/cluster: kafka-server spec: partitions: 10 replicas: 1 config: retention.ms: 7200000 segment.bytes: 1073741824Run the following command to deploy a 1-replica Kafka server named
kafka-serverand 1-replica Kafka topic namedsample-topicin the default namespace.kubectl apply -f kafka.yamlRun the following command to check pod status and wait for Kafka and Zookeeper to be up and running.
$ kubectl get po
NAME                                              READY   STATUS        RESTARTS   AGE
kafka-server-entity-operator-568957ff84-nmtlw     3/3     Running       0          8m42s
kafka-server-kafka-0                              1/1     Running       0          9m13s
kafka-server-zookeeper-0                          1/1     Running       0          9m46s
strimzi-cluster-operator-687fdd6f77-cwmgm         1/1     Running       0          11m
Run the following commands to view the metadata of the Kafka cluster.
# Starts a utility pod.
$ kubectl run utils --image=arunvelsriram/utils -i --tty --rm
# Checks metadata of the Kafka cluster.
$ kafkacat -L -b kafka-server-kafka-brokers:9092
Create Functions
Use the following example YAML file to create a manifest
kafka-input.yamland modify the value ofspec.imageto set your own image registry address. The fieldspec.serving.inputsdefines an input source that points to a Dapr component of the Kafka server. It means that thekafka-inputfunction will be driven by events in the topicsample-topicof the Kafka server.apiVersion: core.openfunction.io/v1beta2 kind: Function metadata: name: kafka-input spec: version: "v1.0.0" image: <your registry name>/kafka-input:latest imageCredentials: name: push-secret build: builder: openfunction/builder-go:latest env: FUNC_NAME: "HandleKafkaInput" FUNC_CLEAR_SOURCE: "true" srcRepo: url: "https://github.com/OpenFunction/samples.git" sourceSubPath: "functions/async/bindings/kafka-input" revision: "main" serving: scaleOptions: minReplicas: 0 maxReplicas: 10 keda: triggers: - type: kafka metadata: topic: sample-topic bootstrapServers: kafka-server-kafka-brokers.default.svc:9092 consumerGroup: kafka-input lagThreshold: "20" scaledObject: pollingInterval: 15 cooldownPeriod: 60 advanced: horizontalPodAutoscalerConfig: behavior: scaleDown: stabilizationWindowSeconds: 45 policies: - type: Percent value: 50 periodSeconds: 15 scaleUp: stabilizationWindowSeconds: 0 triggers: dapr: - name: target-topic type: bindings.kafka bindings: target-topic: type: bindings.kafka version: v1 metadata: - name: brokers value: "kafka-server-kafka-brokers:9092" - name: topics value: "sample-topic" - name: consumerGroup value: "kafka-input" - name: publishTopic value: "sample-topic" - name: authRequired value: "false" template: containers: - name: function imagePullPolicy: AlwaysRun the following command to create the function
kafka-input.kubectl apply -f kafka-input.yamlUse the following example YAML file to create a manifest
function-front.yamland modify the value ofspec.imageto set your own image registry address.
   apiVersion: core.openfunction.io/v1beta2
   kind: Function
   metadata:
     name: function-front
   spec:
     version: "v1.0.0"
     image: "<your registry name>/sample-knative-dapr:latest"
     imageCredentials:
       name: push-secret
     build:
       builder: openfunction/builder-go:latest
       env:
         FUNC_NAME: "ForwardToKafka"
         FUNC_CLEAR_SOURCE: "true"
       srcRepo:
         url: "https://github.com/OpenFunction/samples.git"
         sourceSubPath: "functions/knative/with-output-binding"
         revision: "main"
     serving:
        hooks:
          pre:
            - plugin-custom
            - plugin-example
          post:
            - plugin-example
            - plugin-custom
       scaleOptions:
         minReplicas: 0
         maxReplicas: 5
       outputs:
         - dapr:
             name: kafka-server
             operation: "create"
       bindings:
         kafka-server:
           type: bindings.kafka
           version: v1
           metadata:
             - name: brokers
               value: "kafka-server-kafka-brokers:9092"
             - name: authRequired
               value: "false"
             - name: publishTopic
               value: "sample-topic"
             - name: topics
               value: "sample-topic"
             - name: consumerGroup
               value: "function-front"
       template:
         containers:
           - name: function
             imagePullPolicy: Always
Note
metadata.plugins.pre defines the order of plugins that need to be called before the user function is executed. metadata.plugins.post defines the order of plugins that need to be called after the user function is executed. For more information about the logic of these two plugins and the effect of the plugins after they are executed, see Plugin mechanism.In the manifest,
spec.serving.outputsdefines an output that points to a Dapr component of the Kafka server. That allows you to send custom content to the outputtargetin the functionfunction-front.func Sender(ctx ofctx.Context, in []byte) (ofctx.Out, error) { ... _, err := ctx.Send("target", greeting) ... }Run the following command to create the function
function-front.kubectl apply -f function-front.yaml
Check Results
Run the following command to view the status of the functions.
$ kubectl get functions.core.openfunction.io

NAME             BUILDSTATE   SERVINGSTATE   BUILDER         SERVING         URL                                             AGE
function-front   Succeeded    Running        builder-bhbtk   serving-vc6jw   https://openfunction.io/default/function-front   2m41s
kafka-input      Succeeded    Running        builder-dprfd   serving-75vrt                                                   2m21s
Note
TheURL, provided by the OpenFunction Domain, is the address that can be accessed. To access the function through this URL address, you need to make sure that DNS can resolve this address.Run the following command to create a pod in the cluster for accessing the function.
kubectl run curl --image=radial/busyboxplus:curl -i --tty --rmRun the following command to access the function through
URL.[ root@curl:/ ]$ curl -d '{"message":"Awesome OpenFunction!"}' -H "Content-Type: application/json" -X POST http://openfunction.io.svc.cluster.local/default/function-frontRun the following command to view the log of
function-front.kubectl logs -f \ $(kubectl get po -l \ openfunction.io/serving=$(kubectl get functions function-front -o jsonpath='{.status.serving.resourceRef}') \ -o jsonpath='{.items[0].metadata.name}') \ functionThe output looks as follows.
dapr client initializing for: 127.0.0.1:50001
I0125 06:51:55.584973       1 framework.go:107] Plugins for pre-hook stage:
I0125 06:51:55.585044       1 framework.go:110] - plugin-custom
I0125 06:51:55.585052       1 framework.go:110] - plugin-example
I0125 06:51:55.585057       1 framework.go:115] Plugins for post-hook stage:
I0125 06:51:55.585062       1 framework.go:118] - plugin-custom
I0125 06:51:55.585067       1 framework.go:118] - plugin-example
I0125 06:51:55.585179       1 knative.go:46] Knative Function serving http: listening on port 8080
2022/01/25 06:52:02 http - Data: {"message":"Awesome OpenFunction!"}
I0125 06:52:02.246450       1 plugin-example.go:83] the sum is: 2
Run the following command to view the log of
kafka-input.kubectl logs -f \ $(kubectl get po -l \ openfunction.io/serving=$(kubectl get functions kafka-input -o jsonpath='{.status.serving.resourceRef}') \ -o jsonpath='{.items[0].metadata.name}') \ functionThe output looks as follows.
dapr client initializing for: 127.0.0.1:50001
I0125 06:35:28.332381       1 framework.go:107] Plugins for pre-hook stage:
I0125 06:35:28.332863       1 framework.go:115] Plugins for post-hook stage:
I0125 06:35:28.333749       1 async.go:39] Async Function serving grpc: listening on port 8080
message from Kafka '{Awesome OpenFunction!}'
5.2 - Use SkyWalking for OpenFunction as an Observability Solution
Learn how to use SkyWalking for OpenFunction as an observability solution.
This document describes how to use SkyWalking for OpenFunction as an observability solution.
Overview
Although FaaS allows developers to focus on their business code without worrying about the underlying implementations, it is difficult to troubleshoot the service system. OpenFunction tries to introduce capabilities of observability to improve its usability and stability.
SkyWalking provides solutions for observing and monitoring distributed systems in many different scenarios. OpenFunction has bundled go2sky(SkyWalking’s Golang agent) in OpenFunction tracer options to provide distributed tracing, statistics of function performance, and functions dependency map.
Prerequisites
- You have installed OpenFunction.
- You have followed the OpenFunction prerequisites to create a container registry secret, a Kafka cluster and a Kafka topic.
- You have installed SkyWalking v9.
Tracing Parameters
The following table describes the tracing parameters.
| Name | Description | Example |
|---|---|---|
| enabled | Switch for tracing, default to false. | true, false |
| provider.name | Provider name can be set to “skywalking”, “opentelemetry” (pending). | “skywalking” |
| provider.oapServer | The oap server address. | “skywalking-opa:11800” |
| tags | A collection of key-value pairs for Span custom tags in tracing. | |
| tags.func | The name of function. It will be automatically filled. | “function-a” |
| tags.layer | Indicates the type of service being tracked. It should be set to “faas” when you use the function. | “faas” |
| baggage | A collection of key-value pairs, exists in the tracing and also needs to be transferred across process boundaries. |
The following is a JSON formatted configuration reference that guides the formatting structure of the tracing configuration.
{
  "enabled": true,
  "provider": {
    "name": "skywalking",
    "oapServer": "skywalking-oap:11800"
  },
  "tags": {
    "func": "function-a",
    "layer": "faas",
    "tag1": "value1",
    "tag2": "value2"
  },
  "baggage": {
    "key": "key1",
    "value": "value1"
  }
}
Enable Tracing Configuration of OpenFunction
Option 1: global configuration
This document uses skywalking-oap.default:11800 as an example of the skywalking-oap address in the cluster.
Run the following command to modify the configmap
openfunction-configin theopenfunctionnamespace.kubectl edit configmap openfunction-config -n openfunctionModify the content under
data.plugins.tracingby referring to the following example and save the change.data: tracing: | enabled: true provider: name: "skywalking" oapServer: "skywalking-oap:11800" tags: func: tracing-function layer: faas tag1: value1 tag2: value2 baggage: key: "key1" value: "value1"
Option 2: function-level configuration
To enable tracing configuration in the function-level, add the field plugins.tracing under metadata.annotations in the function manifest as the following example.
metadata:
  name: tracing-function
spec:
   serving:
      tracing:
        enabled: true
        provider:
          name: "skywalking"
          oapServer: "skywalking-oap:11800"
        tags:
          func: tracing-function
          layer: faas
          tag1: value1
          tag2: value2
        baggage:
          key: "key1"
          value: "value1"
It is recommended that you use the global tracing configuration, or you have to add function-level tracing configuration for every function you create.
Use SkyWalking as a Distributed Tracing Solution
Create functions by referring to this document. You can find more examples to create sync and async functions in OpenFunction Quickstarts.
Then, you can observe the flow of entire link on the SkyWalking UI.
You can also observe the comparison of the response time of the Knative runtime function (function-front) in the running state and under cold start.
In cold start:

In running:

5.3 - Elastic Log Alerting
Learn how to create an async function to find out error logs.
This document describes how to create an async function to find out error logs.
Overview
This document uses an asynchronous function to analyze the log stream in Kafka to find out the error logs. The async function will then send alerts to Slack. The following diagram illustrates the entire workflow.
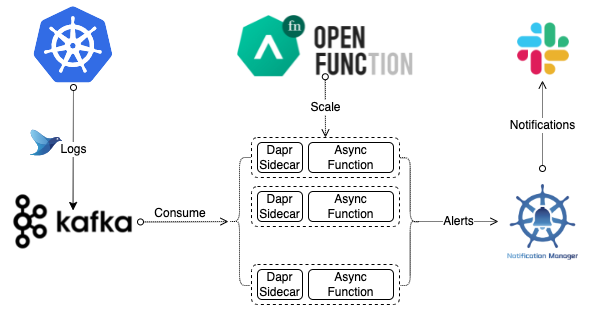
Prerequisites
- You have installed OpenFunction.
- You have created a secret.
Create a Kafka Server and Topic
Run the following commands to install strimzi-kafka-operator in the default namespace.
helm repo add strimzi https://strimzi.io/charts/
helm install kafka-operator -n default strimzi/strimzi-kafka-operator
Use the following content to create a file
kafka.yaml.apiVersion: kafka.strimzi.io/v1beta2 kind: Kafka metadata: name: kafka-logs-receiver namespace: default spec: kafka: version: 3.3.1 replicas: 1 listeners: - name: plain port: 9092 type: internal tls: false - name: tls port: 9093 type: internal tls: true config: offsets.topic.replication.factor: 1 transaction.state.log.replication.factor: 1 transaction.state.log.min.isr: 1 default.replication.factor: 1 min.insync.replicas: 1 inter.broker.protocol.version: "3.1" storage: type: ephemeral zookeeper: replicas: 1 storage: type: ephemeral entityOperator: topicOperator: {} userOperator: {} --- apiVersion: kafka.strimzi.io/v1beta2 kind: KafkaTopic metadata: name: logs namespace: default labels: strimzi.io/cluster: kafka-logs-receiver spec: partitions: 10 replicas: 1 config: retention.ms: 7200000 segment.bytes: 1073741824Run the following command to deploy a 1-replica Kafka server named
kafka-logs-receiverand 1-replica Kafka topic namedlogsin the default namespace.kubectl apply -f kafka.yamlRun the following command to check pod status and wait for Kafka and Zookeeper to be up and running.
$ kubectl get po
NAME                                                     READY   STATUS        RESTARTS   AGE
kafka-logs-receiver-entity-operator-57dc457ccc-tlqqs     3/3     Running       0          8m42s
kafka-logs-receiver-kafka-0                              1/1     Running       0          9m13s
kafka-logs-receiver-zookeeper-0                          1/1     Running       0          9m46s
strimzi-cluster-operator-687fdd6f77-cwmgm                1/1     Running       0          11m
Run the following commands to view the metadata of the Kafka cluster.
# Starts a utility pod.
$ kubectl run utils --image=arunvelsriram/utils -i --tty --rm
# Checks metadata of the Kafka cluster.
$ kafkacat -L -b kafka-logs-receiver-kafka-brokers:9092
Create a Logs Handler Function
- Use the following example YAML file to create a manifest
logs-handler-function.yamland modify the value ofspec.imageto set your own image registry address.
   apiVersion: core.openfunction.io/v1beta2
   kind: Function
   metadata:
     name: logs-async-handler
     namespace: default
   spec:
     build:
       builder: openfunction/builder-go:latest
       env:
         FUNC_CLEAR_SOURCE: "true"
         FUNC_NAME: LogsHandler
       srcRepo:
         revision: main
         sourceSubPath: functions/async/logs-handler-function/
         url: https://github.com/OpenFunction/samples.git
     image: openfunctiondev/logs-async-handler:v1
     imageCredentials:
       name: push-secret
     serving:
       bindings:
         kafka-receiver:
           metadata:
             - name: brokers
               value: kafka-server-kafka-brokers:9092
             - name: authRequired
               value: "false"
             - name: publishTopic
               value: logs
             - name: topics
               value: logs
             - name: consumerGroup
               value: logs-handler
           type: bindings.kafka
           version: v1
         notification-manager:
           metadata:
             - name: url
               value: http://notification-manager-svc.kubesphere-monitoring-system.svc.cluster.local:19093/api/v2/alerts
           type: bindings.http
           version: v1
       outputs:
         - dapr:
             name: notification-manager
             operation: post
             type: bindings.http
       scaleOptions:
         keda:
           scaledObject:
             advanced:
               horizontalPodAutoscalerConfig:
                 behavior:
                   scaleDown:
                     policies:
                       - periodSeconds: 15
                         type: Percent
                         value: 50
                     stabilizationWindowSeconds: 45
                   scaleUp:
                     stabilizationWindowSeconds: 0
             cooldownPeriod: 60
             pollingInterval: 15
           triggers:
             - metadata:
                 bootstrapServers: kafka-server-kafka-brokers.default.svc.cluster.local:9092
                 consumerGroup: logs-handler
                 lagThreshold: "20"
                 topic: logs
               type: kafka
         maxReplicas: 10
         minReplicas: 0
       template:
         containers:
           - imagePullPolicy: IfNotPresent
             name: function
       triggers:
         dapr:
           - name: kafka-receiver
             type: bindings.kafka
       workloadType: Deployment
     version: v2.0.0
     workloadRuntime: OCIContainer
Run the following command to create the function
logs-async-handler.kubectl apply -f logs-handler-function.yamlThe logs handler function will be triggered by messages from the logs topic in Kafka.
6 - Reference
6.1 - Component Specifications
Learn about OpenFunction component specifications.
6.1.1 - Function Specifications
Learn about Function Specifications.
This document describes the specifications of the Function CRD.
Function.spec
| Name | Type | Description | Required |
|---|---|---|---|
| image | string | Image upload path, e.g. demorepo/demofunction:v1 | true |
| build | object | Builder specification for the function | false |
| imageCredentials | object | Credentials for accessing the image repository, refer to v1.LocalObjectReference | false |
| serving | object | Serving specification for the function | false |
| version | string | Function version, e.g. v1.0.0 | false |
| workloadRuntime | string | WorkloadRuntime for Function. Know values: OCIContainer and WasmEdge.Default: OCIContainer | false |
Function.spec.build
| Name | Type | Description | Required |
|---|---|---|---|
| srcRepo | object | The configuration of the source code repository | true |
| builder | string | Name of the Builder | false |
| builderCredentials | object | Credentials for accessing the image repository, refer to v1.LocalObjectReference | false |
| builderMaxAge | string | The maximum time of finished builders to retain. | false |
| dockerfile | string | Path to the Dockerfile instructing Shipwright when using the Dockerfile to build images | false |
| env | map[string]string | Environment variables passed to the buildpacks builder | false |
| failedBuildsHistoryLimit | integer | The number of failed builders to retain. Default is 1. | false |
| shipwright | object | Specification of the Shipwright engine | false |
| successfulBuildsHistoryLimit | integer | The number of successful finished builders to retain. Default is 0. | false |
| timeout | string | The maximum time for the builder to build the image | false |
Function.spec.build.srcRepo
| Name | Type | Description | Required |
|---|---|---|---|
| bundleContainer | object | BundleContainer describes the source code bundle container to pull | false |
| credentials | object | Repository access credentials, refer to v1.LocalObjectReference | false |
| revision | string | Referencable instances in the repository, such as commit ID and branch name. | false |
| sourceSubPath | string | The directory of the function in the repository, e.g. functions/function-a/ | false |
| url | string | Source code repository address | false |
Function.spec.build.srcRepo.bundleContainer
| Name | Type | Description | Required |
|---|---|---|---|
| image | string | The bundleContainer image name | true |
Function.spec.build.shipwright
| Name | Type | Description | Required |
|---|---|---|---|
| params | []object | Parameters for the build strategy | false |
| strategy | object | Strategy references the BuildStrategy to use to build the image | false |
| timeout | string | The maximum amount of time the shipwright Build should take to execute | false |
Function.spec.serving
| Name | Type | Description | Required |
|---|---|---|---|
| annotations | map[string]string | Annotations that will be added to the workload | false |
| bindings | map[string]object | Dapr bindings that the function needs to create and use. | false |
| hooks | object | Hooks that will be executed before or after the function execution | false |
| labels | map[string]string | Labels that will be added to the workload | false |
| outputs | []object | The outputs which the function will send data to | false |
| params | map[string]string | Parameters required by the function, will be passed to the function as environment variables | false |
| pubsub | map[string]object | Dapr pubsub that the function needs to create and use | false |
| scaleOptions | object | Configuration of auto scaling. | false |
| states | map[string]object | Dapr state store that the function needs to create and use | false |
| template | object | Template is a pod template which allows modifying operator generated pod template. | false |
| timeout | string | Timeout defines the maximum amount of time the Serving should take to execute before the Serving is running | false |
| tracing | object | Configuration of tracing | false |
| triggers | object | Triggers used to trigger the function. Refer to Function Trigger. | true |
| workloadType | string | The type of workload used to run the function, known values are: Deployment, StatefulSet and Job | false |
Function.spec.serving.hooks
| Name | Type | Description | Required |
|---|---|---|---|
| policy | string | There are two kind of hooks, global hooks and private hooks, the global hooks define in the config file of OpenFunction Controller,
the private hooks define in the Function. Policy is the relationship between the global hooks and the private hooks of the function. Known values are: Append: All hooks will be executed, the private pre hooks will execute after the global pre hooks , and the private post hooks will execute before the global post hooks. this is the default policy. Override: Only execute the private hooks. | false |
| post | []string | The hooks will be executed after the function execution | false |
| pre | []string | The hooks will be executed before the function execution | false |
Function.spec.serving.outputs[index]
| Name | Type | Description | Required |
|---|---|---|---|
| dapr | object | Dapr output, refer to a exist component or a component defined in bindings or pubsub | false |
Function.spec.serving.outputs[index].dapr
| Name | Type | Description | Required |
|---|---|---|---|
| name | string | The name of the dapr component | true |
| metadata | map[string]string | Metadata passed to Dapr | false |
| operation | string | Operation field tells the Dapr component which operation it should perform, refer to Dapr docs | false |
| topic | string | When the type is pubsub, you need to set the topic | false |
| type | string | Type of Dapr component, such as: bindings.kafka, pubsub.rocketmq | false |
Function.spec.serving.scaleOptions
| Name | Type | Description | Required |
|---|---|---|---|
| keda | object | Configuration about keda autoscaling | false |
| knative | map[string]string | Knative autiscaling annotations. Refer to Knative autoscaling. | false |
| maxReplicas | integer | Minimum number of replicas which will scale the resource down to. By default, it scales to 0. | false |
| minReplicas | integer | Maximum number of replicas which will scale the resource up to. | false |
Function.spec.serving.scaleOptions.keda
| Name | Type | Description | Required |
|---|---|---|---|
| scaledJob | object | Scale options for job | false |
| scaledObject | object | Scale options for deployment and statefulset | false |
| triggers | []object | Event sources that trigger dynamic scaling of workloads. Refer to kedav1alpha1.ScaleTriggers. | false |
Function.spec.serving.scaleOptions.keda.scaledJob
| Name | Type | Description | Required |
|---|---|---|---|
| failedJobsHistoryLimit | integer | How many failed jobs should be kept. It defaults to 100. | false |
| pollingInterval | integer | The pollingInterval is in seconds. This is the interval in which KEDA checks the triggers for the queue length or the stream lag. It defaults to 30 seconds. | false |
| restartPolicy | string | Restart policy for all containers within the pod. Value options are OnFailure or Never. It defaults to Never. | false |
| scalingStrategy | object | Select a scaling strategy. Value options are default, custom, or accurate. The default value is default. Refer to kedav1alpha1.ScalingStrategy | false |
| successfulJobsHistoryLimit | integer | How many completed jobs should be kept. It defaults to 100. | false |
Function.spec.serving.scaleOptions.keda.scaledObject
| Name | Type | Description | Required |
|---|---|---|---|
| advanced | object | This property specifies whether the target resource (for example, Deployment and StatefulSet) should be scaled back to original replicas count after the ScaledObject is deleted. Default behavior is to keep the replica count at the same number as it is in the moment of ScaledObject deletion. Refer to kedav1alpha1.AdvancedConfig. | false |
| cooldownPeriod | integer | The cooldownPeriod is in seconds, and it is the period of time to wait after the last trigger activated before scaling back down to 0. It defaults to 300 seconds. | false |
| pollingInterval | integer | The pollingInterval is in seconds. This is the interval in which KEDA checks the triggers for the queue length or the stream lag. It defaults to 30 seconds. | false |
Function.spec.serving.states[key]
| Name | Type | Description | Required |
|---|---|---|---|
| spec | object | Dapr state stroe component spec. Refer to Dapr docs. | false |
Function.spec.serving.tracing
| Name | Type | Description | Required |
|---|---|---|---|
| baggage | map[string]string | Baggage is contextual information that passed between spans. It is a key-value store that resides alongside span context in a trace, making values available to any span created within that trace. | true |
| enabled | boolean | Wether to enable tracing | true |
| provider | object | The tracing implementation used to create and send span | true |
| tags | map[string]string | The tag that needs to be added to the spans | false |
Function.spec.serving.tracing.provider
| Name | Type | Description | Required |
|---|---|---|---|
| name | string | Tracing provider name, known values are skywalking and opentelemetry | true |
| exporter | object | Service to collect span for opentelemetry | false |
| oapServer | string | The skywalking server url | false |
Function.spec.serving.tracing.provider.exporter
| Name | Type | Description | Required |
|---|---|---|---|
| endpoint | string | The exporter url | true |
| name | string | The exporter name, known values are otlp, jaeger, and zipkin | true |
| compression | string | The compression type to use on OTLP trace requests. Options include gzip. By default no compression will be used. | false |
| headers | string | Key-value pairs separated by commas to pass as request headers on OTLP trace requests. | false |
| protocol | string | The transport protocol to use on OTLP trace requests. Options include grpc and http/protobuf. Default is grpc. | false |
| timeout | string | The maximum waiting time, in milliseconds, allowed to send each OTLP trace batch. Default is 10000. | false |
Function.spec.serving.triggers
| Name | Type | Description | Required |
|---|---|---|---|
| dapr | []object | List of dapr triggers, refer to dapr bindings or pusub components | false |
| http | object | The http trigger | false |
| inputs | []object | A list of components that the function can get data from | false |
Function.spec.serving.triggers.dapr[index]
| Name | Type | Description | Required |
|---|---|---|---|
| name | string | The dapr component name | true |
| topic | string | When the component type is pubsub, you need to set the topic | false |
| type | string | Type of Dapr component, such as: bindings.kafka, pubsub.rocketmq | false |
Function.spec.serving.triggers.http
| Name | Type | Description | Required |
|---|---|---|---|
| port | integer | The port the function is listening on, e.g. 8080 | false |
| route | object | Route defines how traffic from the Gateway listener is routed to a function. | false |
Function.spec.serving.triggers.http.route
| Name | Type | Description | Required |
|---|---|---|---|
| gatewayRef | object | GatewayRef references the Gateway resources that a Route wants | false |
| hostnames | []string | Hostnames defines a set of hostname that should match against the HTTP Host header to select a HTTPRoute to process the request. | false |
| rules | []object | Rules are a list of HTTP matchers, filters and actions. Refer to HTTPRouteRule. | false |
Function.spec.serving.triggers.http.route.gatewayRef
| Name | Type | Description | Required |
|---|---|---|---|
| name | string | The name of the gateway | true |
| namespace | string | The namespace of the gateway | true |
Function.spec.serving.triggers.inputs[index]
| Name | Type | Description | Required |
|---|---|---|---|
| dapr | object | A dapr component that function can get data from. Now just support dapr state store | true |
Function.spec.serving.triggers.inputs[index].dapr
| Name | Type | Description | Required |
|---|---|---|---|
| name | string | The dapr component name, maybe a exist component or a component defined in state | true |
| type | string | The dapr component type, such as state.redis | false |
6.1.2 - EventSource Specifications
Learn about EventSource Specifications.
6.1.2.1 - EventSource Specifications
EventSource Specifications.
This document describes the specifications of the EventSource CRD.
EventSource
| Field | Description |
|---|---|
| apiVersion string | events.openfunction.io/v1alpha1 |
| kind string | EventSource |
| metadata v1.ObjectMeta | (Optional) Refer to v1.ObjectMeta |
| spec EventSourceSpec | Refer to EventSourceSpec |
| status EventSourceStatus | Status of EventSource |
EventSourceSpec
Belong to EventSource.
| Field | Description |
|---|---|
| eventBus string | (Optional) Name of the EventBus resource associated with the event source. |
| redis map[string]RedisSpec | (Optional) The definition of a Redis event source, with key being the event name, refer to RedisSpec. |
| kafka map[string]KafkaSpec | (Optional) The definition of a Kafka event source, with key being the event name, refer to KafkaSpec. |
| cron map[string]CronSpec | (Optional) The definition of a Cron event source, with key being the event name, refer to CronSpec. |
| sink SinkSpec | (Optional) Definition of the Sink (addressable access resource, i.e. synchronization request) associated with the event source, cf. SinkSpec. |
SinkSpec
Belong to EventSourceSpec.
| Field | Description |
|---|---|
| ref Reference | Refer to Reference. |
Reference
Belong to SinkSpec.
Note
The resources cited are generally Knative Service.| Field | Description |
|---|---|
| kind string | The type of the referenced resource. It defaults to Service. |
| namespace string | The namespace of the referenced resource, by default the same as the namespace of the Trigger. |
| name string | Name of the referenced resource, for example, function-ksvc. |
| apiVersion string | The apiVersion of the referenced resource. It defaults to serving.knative.dev/v1. |
GenericScaleOption
Belong to scaleOption.
| Field | Description |
|---|---|
| pollingInterval int | This is the interval to check each trigger on. It defaults to 30 seconds. |
| cooldownPeriod int | The period to wait after the last trigger reported active before scaling the resource back to 0. It defaults to 300 seconds. |
| minReplicaCount int | Minimum number of replicas KEDA will scale the resource down to. It defaults to 0. |
| maxReplicaCount int | This setting is passed to the HPA definition that KEDA will create for a given resource. |
| advanced kedav1alpha1.AdvancedConfig | See KEDA documentation. |
| metadata map[string]string | KEDA trigger’s metadata |
| authRef kedav1alpha1.ScaledObjectAuthRef | Every parameter you define in TriggerAuthentication definition does not need to be included in the metadata of the trigger for your ScaledObject definition. To reference a TriggerAuthentication from a ScaledObject you add the authenticationRef to the trigger, refer to KEDA documentation. |
6.1.2.2 - Redis
Event source specifications of Redis.
RedisSpec
Belong to EventSourceSpec.
Note
The EventSource generates Dapr Bindings Components for adapting Redis event sources according to the RedisSpec, and in principle we try to maintain the consistency of the relevant parameters. For more information, see Redis binding spec.| Field | Description |
|---|---|
| redisHost string | Address of the Redis server, e.g. localhost:6379. |
| redisPassword string | Password for the Redis server, e.g. 123456. |
| enableTLS bool | (Optional) Whether to enable TLS access, which defaults to false. Value options: true, false. |
| failover bool | (Optional) Whether to enable the failover feature. Requires the sentinalMasterName to be set. It defaults to false. Value options: true, false. |
| sentinelMasterName string | (Optional) The name of the sentinel master. Refer to Redis Sentinel Documentation. |
| redeliverInterval string | (Optional) The interval for redeliver. It defaults to 60s. 0 means the redeliver mechanism is disabled. E.g. 30s |
| processingTimeout string | (Optional) Message processing timeout. It defaults to 15s. 0 means timeout is disabled. E.g. 30s |
| redisType string | (Optional) The type of Redis. Value options: node for single-node mode, cluster for cluster mode. It defaults to node. |
| redisDB int64 | (Optional) The database index to connect to Redis. Effective only if redisType is node. It defaults to 0. |
| redisMaxRetries int64 | (Optional) Maximum number of retries. It defaults to no retries. E.g. 5 |
| redisMinRetryInterval string | (Optional) Minimum backoff time for retries. The default value is 8ms. -1 indicates that the backoff time is disabled. E.g. 10ms |
| redisMaxRetryInterval string | (Optional) Maximum backoff time for retries. The default value is 512ms. -1 indicates that the backoff time is disabled. E.g. 5s |
| dialTimeout string | (Optional) Timeout to establish a new connection. It defaults to 5s. |
| readTimeout string | (Optional) Read timeout. A timeout causes Redis commands to fail rather than wait in a blocking fashion. It defaults to 3s. -1 means disabled. |
| writeTimeout string | (Optional) Write timeout. A timeout causes Redis commands to fail rather than wait in a blocking fashion. It defaults to consistent with readTimeout. |
| poolSize int64 | (Optional) Maximum number of connections. It defaults to 10 connections per runtime.NumCPU. E.g. 20 |
| poolTimeout string | (Optional) The timeout for the connection pool. The default is readTimeout + 1 second. E.g. 50s |
| maxConnAge string | (Optional) Connection aging time. The default is not to close the aging connection. E.g. 30m |
| minIdleConns int64 | (Optional) The minimum number of idle connections to maintain to avoid performance degradation from creating new connections. It defaults to 0. E.g. 2 |
| idleCheckFrequency string | (Optional) Frequency of idle connection recycler checks. Default is 1m. -1 means the idle connection recycler is disabled. E.g. -1 |
| idleTimeout string | (Optional) Timeout to close idle client connections, which should be less than the server’s timeout. It defaults to 5m. -1 means disable idle timeout check. E.g. 10m |
6.1.2.3 - Kafka
Event source specifications of Kafka.
KafkaSpec
Belong to EventSourceSpec.
Note
The EventSource generates Dapr Bindings Components for adapting Kafka event sources according to the KafkaSpec, and in principle we try to maintain the consistency of the relevant parameters. You can get more information by visiting the Kafka binding spec.| Field | Description |
|---|---|
| brokers string | A comma-separated string of Kafka server addresses, for example, localhost:9092. |
| authRequired bool | Whether to enable SASL authentication for the Kafka server. Value options: true, false. |
| topic string | The topic name of the Kafka event source, for example, topicA, myTopic. |
| saslUsername string | (Optional) The SASL username to use for authentication. Only required if authRequired is true. For example, admin. |
| saslPassword string | (Optional) The SASL user password for authentication. Only required if authRequired is true. For example, 123456. |
| maxMessageBytes int64 | (Optional) The maximum number of bytes a single message is allowed to contain. Default is 1024. For example, 2048. |
| scaleOption KafkaScaleOption | (Optional) Kafka’s scale configuration. |
KafkaScaleOption
Belong to KafkaSpec.
| Field | Description |
|---|---|
| GenericScaleOption | Generic scale configuration. |
| consumerGroup string | Kafka’s consumer group name. |
| topic string | Topic under monitoring, for example, topicA, myTopic. |
| lagThreshold string | Threshold for triggering scaling, in this case is the Kafka’s lag. |
6.1.2.4 - Cron
Event source specifications of Cron.
CronSpec
Belong to EventSourceSpec.
Note
The EventSource generates Dapr Bindings Components for adapting Cron event sources according to the CronSpec, and in principle we try to maintain the consistency of the relevant parameters. For more information, see the Cron binding spec.| Field | Description |
|---|---|
| schedule string | Refer to Schedule format for a valid schedule format, for example, @every 15m. |
6.1.3 - EventBus Specifications
Learn about EventBus Specifications.
6.1.3.1 - EventBus Specifications
EventBus Specifications.
This document describes the specifications of the EventBus (ClusterEventBus) CRD.
EventBus (ClusterEventBus)
| Field | Description |
|---|---|
| apiVersion string | events.openfunction.io/v1alpha1 |
| kind string | EventBus(ClusterEventBus) |
| metadata v1.ObjectMeta | (Optional) Refer to v1.ObjectMeta |
| spec EventBusSpec | Refer to EventBusSpec |
| status EventBusStatus | Status of EventBus(ClusterEventBus) |
EventBusSpec
Belong to EventBus.
| Field | Description |
|---|---|
| topic string | The topic name of the event bus. |
| natsStreaming NatsStreamingSpec | Definition of the Nats Streaming event bus (currently only supported). See NatsStreamingSpec. |
GenericScaleOption
Belong to scaleOption.
| Field | Description |
|---|---|
| pollingInterval int | The interval to check each trigger on. It defaults to 30 seconds. |
| cooldownPeriod int | The period to wait after the last trigger reported active before scaling the resource back to 0. It defaults to 300 seconds. |
| minReplicaCount int | Minimum number of replicas which KEDA will scale the resource down to. It defaults to 0. |
| maxReplicaCount int | This setting is passed to the HPA definition that KEDA will create for a given resource. |
| advanced kedav1alpha1.AdvancedConfig | See KEDA documentation. |
| metadata map[string]string | KEDA trigger’s metadata. |
| authRef kedav1alpha1.ScaledObjectAuthRef | Every parameter you define in TriggerAuthentication definition does not need to be included in the metadata of the trigger for your ScaledObject definition. To reference a TriggerAuthentication from a ScaledObject, add the authRef to the trigger. Refer to KEDA documentation. |
6.1.3.2 - NATS Streaming
Event bus specifications of NATS Streaming.
NatsStreamingSpec
Belong to EventBusSpec.
Note
The EventBus (ClusterEventBus) provides the configuration to the EventSource and Trigger references in order to generate the corresponding Dapr Pub/Sub Components to get messages from the event bus, and in principle we try to maintain consistency in the relevant parameters. For more information, see the NATS Streaming pubsub spec.| Field | Description |
|---|---|
| natsURL string | NATS server address, for example, nats://localhost:4222. |
| natsStreamingClusterID string | NATS cluster ID, for example, stan. |
| subscriptionType string | Subscriber type, value options: topic, queue. |
| ackWaitTime string | (Optional) Refer to Acknowledgements , for example, 300ms. |
| maxInFlight int64 | (Optional) Refer to Max In Flight , for example, 25. |
| durableSubscriptionName string | (Optional) The name of the persistent subscriber. For example, my-durable. |
| deliverNew bool | (Optional) Subscriber options (only one can be used). Whether to send only new messages. Value options: true, false. |
| startAtSequence int64 | (Optional) Subscriber options (only one can be used). Set the starting sequence position and status. For example, 100000. |
| startWithLastReceived bool | (Optional) Subscriber options (only one can be used). Whether to set the start position to the latest news place. Value options: true, false. |
| deliverAll bool | (Optional) Subscriber options (only one can be used). Whether to send all available messages. Value options: true, false. |
| startAtTimeDelta string | (Optional) Subscriber options (only one can be used). Use the difference form to set the desired start time position and state, for example, 10m, 23s. |
| startAtTime string | (Optional) Subscriber options (only one can be used). Set the desired start time position and status using the marker value form. For example, Feb 3, 2013 at 7:54pm (PST). |
| startAtTimeFormat string | (Optional) Must be used with startAtTime. Sets the format of the time. For example, Jan 2, 2006 at 3:04pm (MST). |
| scaleOption NatsStreamingScaleOption | (Optional) Nats streaming’s scale configuration. |
NatsStreamingScaleOption
Belong to NatsStreamingSpec.
| Field | Description |
|---|---|
| GenericScaleOption | Generic scale configuration. |
| natsServerMonitoringEndpoint string | Nats streaming’s monitoring endpoint. |
| queueGroup string | Nats streaming’s queue group name. |
| durableName string | Nats streaming’s durable name. |
| subject string | Subject under monitoring, for example, topicA, myTopic. |
| lagThreshold string | Threshold for triggering scaling, in this case is the Nats Streaming’s lag. |
6.1.4 - Trigger Specifications
Learn about Trigger Specifications.
This document describes the specifications of the Trigger CRD.
Trigger
| Field | Description |
|---|---|
| apiVersion string | events.openfunction.io/v1alpha1 |
| kind string | Trigger |
| metadata v1.ObjectMeta | (Optional) Refer to v1.ObjectMeta |
| spec TriggerSpec | Refer to TriggerSpec |
| status TriggerStatus | Status of Trigger |
TriggerSpec
Belong to Trigger.
| Field | Description |
|---|---|
| eventBus string | (Optional) Name of the EventBus resource associated with the Trigger. |
| inputs map[string]Input | (Optional) The input of trigger, with key being the input name. Refer to Input. |
| subscribers []Subscriber | (Optional) The subscriber of the trigger. Refer to Subscriber. |
Input
Belong to TriggerSpec.
| Field | Description |
|---|---|
| namespace string | (Optional) The namespace name of the EventSource, which by default matches the namespace of the Trigger, for example, default. |
| eventSource string | EventSource name, for example, kafka-eventsource. |
| event string | Event name, for example, eventA. |
Subscriber
Belong to TriggerSpec.
| Field | Description |
|---|---|
| condition string | Trigger conditions for triggers, refer to cel-spec for more writing specifications, for example, eventA && eventB or `eventA |
| sink SinkSpec | (Optional) Triggered Sink (addressable access resource, for example, synchronization request) definition, refer to SinkSpec. |
| deadLetterSink SinkSpec | (Optional) Triggered dead letter Sink (addressable access resource, for example, synchronization request) definition, refer to SinkSpec. |
| topic string | (Optional) Used to send post-trigger messages to the specified topic of the event bus, for example, topicTriggered. |
| deadLetterTopic string | (Optional) Used to send post-trigger messages to the specified dead letter topic of the event bus, for example, topicDL. |
SinkSpec
Belong to EventSourceSpec.
| Field | Description |
|---|---|
| ref Reference | Refer to Reference. |
Reference
Belong to SinkSpec.
Note
The resources cited are generally Knative Service.| Field | Description |
|---|---|
| kind string | The type of the referenced resource. It defaults to Service. |
| namespace string | The namespace of the referenced resource, by default the same as the namespace of the Trigger. |
| name string | Name of the referenced resource, for example, function-ksvc. |
| apiVersion string | The apiVersion of the referenced resource. It defaults to serving.knative.dev/v1. |
6.2 - FAQ
This document describes FAQs when using OpenFunction.
Q: How to use private image repositories in OpenFunction?
A: OpenFunction uses Shipwright (which utilizes Tekton to integrate with Cloud Native Buildpacks) in the build phase to package the user function to the application image.
Users often choose to access a private image repository in an insecure way, which is not yet supported by the Cloud Native Buildpacks.
We offer a workaround as below to get around this limitation for now:
- Use IP address instead of hostname as access address for private image repository.
- You should skip tag-resolution when you run the Knative-runtime function.
For references:
buildpacks/tekton-integration#31
Q: How to access the Knative-runtime function without introducing a new ingress controller?
A: OpenFunction provides a unified entry point for function accessibility, which is based on the Ingress Nginx implementation. However, for some users, this is not necessary, and instead, introducing a new ingress controller may affect the current cluster.
In general, accessible addresses are for the sync(Knative-runtime) functions. Here are two ways to solve this problem:
Magic DNS
You can follow this guide to config the DNS.
CoreDNS
This is similar to using Magic DNS, with the difference that the configuration for DNS resolution is placed inside CoreDNS. Assume that the user has configured a domain named “openfunction.dev” in the ConfigMap
config-domainunder theknative-servingnamespace (as shown below):$ kubectl -n knative-serving get cm config-domain -o yaml apiVersion: v1 data: openfunction.dev: "" kind: ConfigMap metadata: annotations: knative.dev/example-checksum: 81552d0b labels: app.kubernetes.io/part-of: knative-serving app.kubernetes.io/version: 1.0.1 serving.knative.dev/release: v1.0.1 name: config-domain namespace: knative-servingNext, let’s add an A record for this domain. OpenFunction uses Kourier as the default network layer for Knative Serving, which is where the domain should flow to.
$ kubectl -n kourier-system get svc

NAME               TYPE           CLUSTER-IP     EXTERNAL-IP   PORT(S)                      AGE
kourier            LoadBalancer   10.233.7.202   <pending>     80:31655/TCP,443:30980/TCP   36m
kourier-internal   ClusterIP      10.233.47.71   <none>        80/TCP                       36m
Then the user only needs to configure this Wild-Card DNS resolution in CoreDNS to resolve the URL address of any Knative Service in the cluster.
Where “10.233.47.71” is the address of the Service kourier-internal.
$ kubectl -n kube-system get cm coredns -o yaml

apiVersion: v1
data:
  Corefile: |
    .:53 {
        errors
        health
        ready
        template IN A openfunction.dev {
          match .*\.openfunction\.dev
          answer "{{ .Name }} 60 IN A 10.233.47.71"
          fallthrough
        }
        kubernetes cluster.local in-addr.arpa ip6.arpa {
          pods insecure
          fallthrough in-addr.arpa ip6.arpa
        }
        hosts /etc/coredns/NodeHosts {
          ttl 60
          reload 15s
          fallthrough
        }
        prometheus :9153
        forward . /etc/resolv.conf
        cache 30
        loop
        reload
        loadbalance
    }
    ...
If the user cannot resolve the URL address for this function outside the cluster, configure the
hostsfile as follows:Where “serving-sr5v2-ksvc-sbtgr.default.openfunction.dev” is the URL address obtained from the command “kubectl get ksvc”.
10.233.47.71 serving-sr5v2-ksvc-sbtgr.default.openfunction.dev
After the above configuration is done, you can get the URL address of the function with the following command. Then you can trigger the function via curl or your browser.
$ kubectl get ksvc

NAME                       URL
serving-sr5v2-ksvc-sbtgr   http://serving-sr5v2-ksvc-sbtgr.default.openfunction.dev
Q: How to enable and configure concurrency for functions?
A: OpenFunction categorizes function types into “sync runtime” and “async runtime” based on the type of request being handled. These two types of functions are driven by Knative Serving and Dapr + KEDA.
Therefore, to enable and configure the concurrency of functions, you need to refer to the specific implementation in the above components.
The following section describes how to enable and configure concurrency of functions in OpenFunction according to the “sync runtime” and “async runtime” sections.
Sync runtime
You can start by referring to this document in Knative Serving on enabling and configuring concurrency capabilities.
Knative Serving has Soft limit and Hard limit configurations for the concurrency feature.
Soft limit
You can refer to the Global(ConfigMap) and Global(Operator) sections of this document to configure global concurrency capabilities.
And for Per Revision you can configure it like this.
apiVersion: core.openfunction.io/v1beta2
kind: Function
metadata:
  name: function-sample
spec:
  serving:
    scaleOptions:
      knative:
        autoscaling.knative.dev/target: "200"
Hard limit
OpenFunction currently doesn’t support configuring Hard limit for Per Revision. You can refer to the Global(ConfigMap) and Global(Operator) sections of this document to configure global concurrency capabilities.
In summary
In a nutshell, you can configure Knative Serving’s Autoscaling-related configuration items for each function as follows, just as long as they can be passed in as Annotation, otherwise, you can only do global settings.
# Configuration in Knative Serving
apiVersion: serving.knative.dev/v1
kind: Service
metadata:
  name: helloworld-go
  namespace: default
spec:
  template:
    metadata:
      annotations:
        autoscaling.knative.dev/<key>: "value"

# Configuration in OpenFunction (recommended)
apiVersion: core.openfunction.io/v1beta2
kind: Function
metadata:
  name: function-sample
spec:
  serving:
    scaleOptions:
      knative:
          <key>: "value"

# Alternative approach
apiVersion: core.openfunction.io/v1beta2
kind: Function
metadata:
  name: function-sample
spec:
  serving:
    annotations:
      autoscaling.knative.dev/<key>: "value"
Async runtime
You can start by referring to the document in Dapr on enabling and configuring concurrency capabilities.
Compared to the concurrency configuration of sync runtime, the concurrency configuration of async runtime is simpler.
# Configuration in Dapr
apiVersion: apps/v1
kind: Deployment
metadata:
  name: nodesubscriber
  namespace: default
spec:
  template:
    metadata:
      annotations:
        dapr.io/app-max-concurrency: "value"

# Configuration in OpenFunction (recommended)
apiVersion: core.openfunction.io/v1beta2
kind: Function
metadata:
  name: function-sample
spec:
  serving:
    annotations:
      dapr.io/app-max-concurrency: "value"
Q: How to create source repository credential for the function image build process?
A: You may be prompted with errors like Unsupported type of credentials provided, either SSH private key or username/password is supported (exit code 110) when using spec.build.srcRepo.credentials, which means you are using an incorrect Secret resource as source repository crendital.
OpenFunction currently implements the function image building framework based on ShipWright, so we need to refer to this document to setup the correct source repository credential.
Q: How to install OpenFunction in an offline environment?
A: You can install and use OpenFunction in an offline environment by following steps:
Pull the Helm Chart
Pull the helm chart in an environment that can access GitHub:
helm repo add openfunction https://openfunction.github.io/charts/
helm repo update
helm pull openfunction/openfunction
Then use tools like scp to copy the helm package to your offline environment, e.g.:
scp openfunction-v1.0.0-v0.5.0.tgz <username>@<your-machine-ip>:/home/<username>/
Synchronize images
You need to sync these images to your private image repository:
# dapr
docker.io/daprio/dashboard:0.10.0
docker.io/daprio/dapr:1.8.3

# keda
openfunction/keda:2.8.1
openfunction/keda-metrics-apiserver:2.8.1

# contour
docker.io/bitnami/contour:1.21.1-debian-11-r5
docker.io/bitnami/envoy:1.22.2-debian-11-r6
docker.io/bitnami/nginx:1.21.6-debian-11-r10

# tekton-pipelines
openfunction/tektoncd-pipeline-cmd-controller:v0.37.2
openfunction/tektoncd-pipeline-cmd-kubeconfigwriter:v0.37.2
openfunction/tektoncd-pipeline-cmd-git-init:v0.37.2
openfunction/tektoncd-pipeline-cmd-entrypoint:v0.37.2
openfunction/tektoncd-pipeline-cmd-nop:v0.37.2
openfunction/tektoncd-pipeline-cmd-imagedigestexporter:v0.37.2
openfunction/tektoncd-pipeline-cmd-pullrequest-init:v0.37.2
openfunction/tektoncd-pipeline-cmd-workingdirinit:v0.37.2
openfunction/cloudsdktool-cloud-sdk@sha256:27b2c22bf259d9bc1a291e99c63791ba0c27a04d2db0a43241ba0f1f20f4067f
openfunction/distroless-base@sha256:b16b57be9160a122ef048333c68ba205ae4fe1a7b7cc6a5b289956292ebf45cc
openfunction/tektoncd-pipeline-cmd-webhook:v0.37.2

# knative-serving
openfunction/knative.dev-serving-cmd-activator:v1.3.2
openfunction/knative.dev-serving-cmd-autoscaler:v1.3.2
openfunction/knative.dev-serving-cmd-queue:v1.3.2
openfunction/knative.dev-serving-cmd-controller:v1.3.2
openfunction/knative.dev-serving-cmd-domain-mapping:v1.3.2
openfunction/knative.dev-serving-cmd-domain-mapping-webhook:v1.3.2
openfunction/knative.dev-net-contour-cmd-controller:v1.3.0
openfunction/knative.dev-serving-cmd-default-domain:v1.3.2
openfunction/knative.dev-serving-cmd-webhook:v1.3.2

# shipwright-build
openfunction/shipwright-shipwright-build-controller:v0.10.0
openfunction/shipwright-io-build-git:v0.10.0
openfunction/shipwright-mutate-image:v0.10.0
openfunction/shipwright-bundle:v0.10.0
openfunction/shipwright-waiter:v0.10.0
openfunction/buildah:v1.23.3
openfunction/buildah:v1.28.0

# openfunction
openfunction/openfunction:v1.0.0
openfunction/kube-rbac-proxy:v0.8.0
openfunction/eventsource-handler:v4
openfunction/trigger-handler:v4
openfunction/dapr-proxy:v0.1.1
openfunction/revision-controller:v1.0.0
Create custom values
Create custom-values.yaml in your offline environment:
touch custom-values.yaml
Edit custom-values.yaml, add the following content:
knative-serving:
  activator:
    activator:
      image:
        repository: <your-private-image-repository>/knative.dev-serving-cmd-activator
  autoscaler:
    autoscaler:
      image:
        repository: <your-private-image-repository>/knative.dev-serving-cmd-autoscaler
  configDeployment:
    queueSidecarImage:
      repository: <your-private-image-repository>/knative.dev-serving-cmd-queue
  controller:
    controller:
      image:
        repository: <your-private-image-repository>/knative.dev-serving-cmd-controller
  domainMapping:
    domainMapping:
      image:
        repository: <your-private-image-repository>/knative.dev-serving-cmd-domain-mapping
  domainmappingWebhook:
    domainmappingWebhook:
      image:
        repository: <your-private-image-repository>/knative.dev-serving-cmd-domain-mapping-webhook
  netContourController:
    controller:
      image:
        repository: <your-private-image-repository>/knative.dev-net-contour-cmd-controller
  defaultDomain:
    job:
      image:
        repository: <your-private-image-repository>/knative.dev-serving-cmd-default-domain
  webhook:
    webhook:
      image:
        repository: <your-private-image-repository>/knative.dev-serving-cmd-webhook
shipwright-build:
  shipwrightBuildController:
    shipwrightBuild:
      image:
        repository: <your-private-image-repository>/shipwright-shipwright-build-controller
      GIT_CONTAINER_IMAGE:
        repository: <your-private-image-repository>/shipwright-io-build-git
      MUTATE_IMAGE_CONTAINER_IMAGE:
        repository: <your-private-image-repository>/shipwright-mutate-image
      BUNDLE_CONTAINER_IMAGE:
        repository: <your-private-image-repository>/shipwright-bundle
      WAITER_CONTAINER_IMAGE:
        repository: <your-private-image-repository>/shipwright-waiter
tekton-pipelines:
  controller:
    tektonPipelinesController:
      image:
        repository: <your-private-image-repository>/tektoncd-pipeline-cmd-controller
      kubeconfigWriterImage:
        repository: <your-private-image-repository>/tektoncd-pipeline-cmd-kubeconfigwriter
      gitImage:
        repository: <your-private-image-repository>/tektoncd-pipeline-cmd-git-init
      entrypointImage:
        repository: <your-private-image-repository>/tektoncd-pipeline-cmd-entrypoint
      nopImage:
        repository: <your-private-image-repository>/tektoncd-pipeline-cmd-nop
      imagedigestExporterImage:
        repository: <your-private-image-repository>/tektoncd-pipeline-cmd-imagedigestexporter
      prImage:
        repository: <your-private-image-repository>/tektoncd-pipeline-cmd-pullrequest-init
      workingdirinitImage:
        repository: <your-private-image-repository>/tektoncd-pipeline-cmd-workingdirinit
      gsutilImage:
        repository: <your-private-image-repository>/cloudsdktool-cloud-sdk
        digest: sha256:27b2c22bf259d9bc1a291e99c63791ba0c27a04d2db0a43241ba0f1f20f4067f
      shellImage:
        repository: <your-private-image-repository>/distroless-base
        digest: sha256:b16b57be9160a122ef048333c68ba205ae4fe1a7b7cc6a5b289956292ebf45cc
  webhook:
    webhook:
      image:
        repository: <your-private-image-repository>/tektoncd-pipeline-cmd-webhook
keda:
  image:
    keda:
      repository: <your-private-image-repository>/keda
      tag: 2.8.1
    metricsApiServer:
      repository: <your-private-image-repository>/keda-metrics-apiserver
      tag: 2.8.1
dapr:
  global:
    registry: <your-private-image-registry>/daprio
    tag: '1.8.3'
contour:
  contour:
    image:
      registry: <your-private-image-registry>
      repository: <your-private-image-repository>/contour
      tag: 1.21.1-debian-11-r5
  envoy:
    image:
      registry: <your-private-image-registry>
      repository: <your-private-image-repository>/envoy
      tag: 1.22.2-debian-11-r6
  defaultBackend:
    image:
      registry: <your-private-image-registry>
      repository: <your-private-image-repository>/nginx
      tag: 1.21.6-debian-11-r10
Install OpenFunction
Run the following command in an offline environment to try to install OpenFunction:
kubectl create namespace openfunction
helm install openfunction openfunction-v1.0.0-v0.5.0.tgz -n openfunction -f custom-values.yaml
Note
If the helm install command gets stuck, it may be caused by the job contour-contour-cergen.
Run the following command to confirm whether the job is executed successfully:
kubectl get job contour-contour-cergen -n projectcontour
If the job exists and the job status is completed, run the following command to complete the installation:
helm uninstall openfunction -n openfunction --no-hooks
helm install openfunction openfunction-v1.0.0-v0.5.0.tgz -n openfunction -f custom-values.yaml --no-hooks
Patch ClusterBuildStrategy
If you want to build wasm functions or use buildah to build functions in offline environment, run the following command to patch ClusterBuildStrategy:
kubectl patch clusterbuildstrategy buildah --type='json' -p='[{"op": "replace", "path": "/spec/buildSteps/0/image", "value":"openfunction/buildah:v1.28.0"}]'
kubectl patch clusterbuildstrategy wasmedge --type='json' -p='[{"op": "replace", "path": "/spec/buildSteps/0/image", "value":"openfunction/buildah:v1.28.0"}]'
Q: How to build and run functions in an offline environment
A: Let’s take Java functions as an example to illustrate how to build and run functions in an offline environment:
Synchronize
https://github.com/OpenFunction/samples.gitto your private code repositoryFollow this prerequisites doc to create
push-secretandgit-repo-secretChange public maven repository to private maven repository:
<?xml version="1.0" encoding="UTF-8"?>
<project xmlns="http://maven.apache.org/POM/4.0.0"
         xmlns:xsi="http://www.w3.org/2001/XMLSchema-instance"
         xsi:schemaLocation="http://maven.apache.org/POM/4.0.0 http://maven.apache.org/xsd/maven-4.0.0.xsd">
    <modelVersion>4.0.0</modelVersion>

    <groupId>dev.openfunction.samples</groupId>
    <artifactId>samples</artifactId>
    <version>1.0-SNAPSHOT</version>

    <properties>
        <maven.compiler.source>11</maven.compiler.source>
        <maven.compiler.target>11</maven.compiler.target>
    </properties>

    <repositories>
        <repository>
            <id>snapshots</id>
            <name>Maven snapshots</name>
                <!--<url>https://s01.oss.sonatype.org/content/repositories/snapshots/</url>-->
                <url>your private maven repository</url>
            <releases>
                <enabled>false</enabled>
            </releases>
            <snapshots>
                <enabled>true</enabled>
            </snapshots>
        </repository>
    </repositories>

    <dependencies>
        <dependency>
            <groupId>dev.openfunction.functions</groupId>
            <artifactId>functions-framework-api</artifactId>
            <version>1.0.0-SNAPSHOT</version>
        </dependency>
    </dependencies>

</project>
Make sure to commit the changes to the code repo.
Synchronize
openfunction/buildpacks-java18-run:v1to your private image repositoryModify
functions/knative/java/hello-world/function-sample.yamlaccording to your environment:apiVersion: core.openfunction.io/v1beta2 kind: Function metadata: name: function-http-java spec: version: "v2.0.0" image: "<your private image repository>/sample-java-func:v1" imageCredentials: name: push-secret build: builder: <your private image repository>/builder-java:v2-18 params: RUN_IMAGE: "<your private image repository>/buildpacks-java18-run:v1" env: FUNC_NAME: "dev.openfunction.samples.HttpFunctionImpl" FUNC_CLEAR_SOURCE: "true" srcRepo: url: "https://<your private code repository>/OpenFunction/samples.git" sourceSubPath: "functions/knative/java" revision: "main" credentials: name: git-repo-secret serving: template: containers: - name: function # DO NOT change this imagePullPolicy: IfNotPresent triggers: http: port: 8080If your private mirror repository is insecure, please refer to Use private image repository in an insecure way
Run the following commands to build and run the function:
kubectl apply -f functions/knative/java/hello-world/function-sample.yaml
7 - Contributing
7.1 - Overview
This document provides the guidelines for how to contribute to the OpenFunction through issues and pull-requests. Contributions can also come in additional ways such as engaging with the community in community calls, commenting on issues or pull requests and more.
See the OpenFunction community repository for more information on community engagement and community membership.
Issues
Issue types
In most OpenFunction repositories there are usually 4 types of issues:
- Issue/Bug report: You’ve found a bug and want to report and track it.
- Issue/Feature request: You want to use a feature and it’s not supported yet.
- Issue/Proposal: Used for items that propose a new idea or functionality. This allows feedback from others before code is written.
Before submitting
Before you submit an issue, make sure you’ve checked the following:
- Is it the right repository?
- The OpenFunction project is distributed across multiple repositories. Check the list of repositories if you aren’t sure which repo is the correct one.
- Check for existing issues
- Before you create a new issue, please do a search in open issues to see if the issue or feature request has already been filed.
- If you find your issue already exists, make relevant comments and add your reaction. Use a reaction:
- 👍 up-vote
- 👎 down-vote
Pull Requests
All contributions come through pull requests. To submit a proposed change, follow this workflow:
- Make sure there’s an issue raised, which sets the expectations for the contribution you are about to make.
- Fork the relevant repo and create a new branch
- Create your change
- Code changes require tests
- Update relevant documentation for the change
- Commit with DCO sign-off and open a PR
- Wait for the CI process to finish and make sure all checks are green
- You can expect a review within a few days
Use work-in-progress PRs for early feedback
A good way to communicate before investing too much time is to create a “Work-in-progress” PR and share it with your reviewers. The standard way of doing this is to add a “[WIP]” prefix in your PR’s title and assign the do-not-merge label. This will let people looking at your PR know that it is not ready yet.
Developer Certificate of Origin: Signing your work
Every commit needs to be signed
The Developer Certificate of Origin (DCO) is a lightweight way for contributors to certify that they wrote or otherwise have the right to submit the code they are contributing to the project. Here is the full text of the DCO
Contributors sign-off that they adhere to these requirements by adding a Signed-off-by line to commit messages.
This is my commit message
Signed-off-by: Random J Developer <random@developer.example.org>
Git has a -s command line option to append this automatically to your commit message:
git commit -s -m 'This is my commit message'
Each Pull Request is checked whether or not commits in a Pull Request do contain a valid Signed-off-by line.
I didn’t sign my commit, now what?!
No worries - You can easily replay your changes, sign them and force push them!
git checkout <branch-name>
git commit --amend --no-edit --signoff
git push --force-with-lease <remote-name> <branch-name>
Development Guide
Here you can find a development guide that will walk you through how to get started with building OpenFunction in your local environment.
Code of Conduct
Please see the OpenFunction community code of conduct.
7.2 - Roadmap
OpenFunction encourages the community to help with prioritization. A GitHub project of OpenFunction’s roadmap is available for the community to provide feedbacks on proposed issues and track them across development.
Please vote by adding a 👍 on the GitHub issues for the feature capabilities you would most like to see OpenFunction support. This will help the OpenFunction maintainers to have a better understanding of your requirements.
Contributions from the community is always welcomed. If there are features on the roadmap that you are interested in contributing to, please comment on the GitHub issue and include your solution proposal.